
16s Sequencing Processing
16S Sequencing Protocol for the Putnam Lab
Written by Emma Strand 20210315 and continuously updated through March 2022.
Contents:
- Next Gen 16S Sequencing Primer Design
- WORKING Lab Protocol
- Holoboint Integration 16S V4 Sample Processing
Holobiont Integration 16S V3/V4 sample processing in this notebook post()
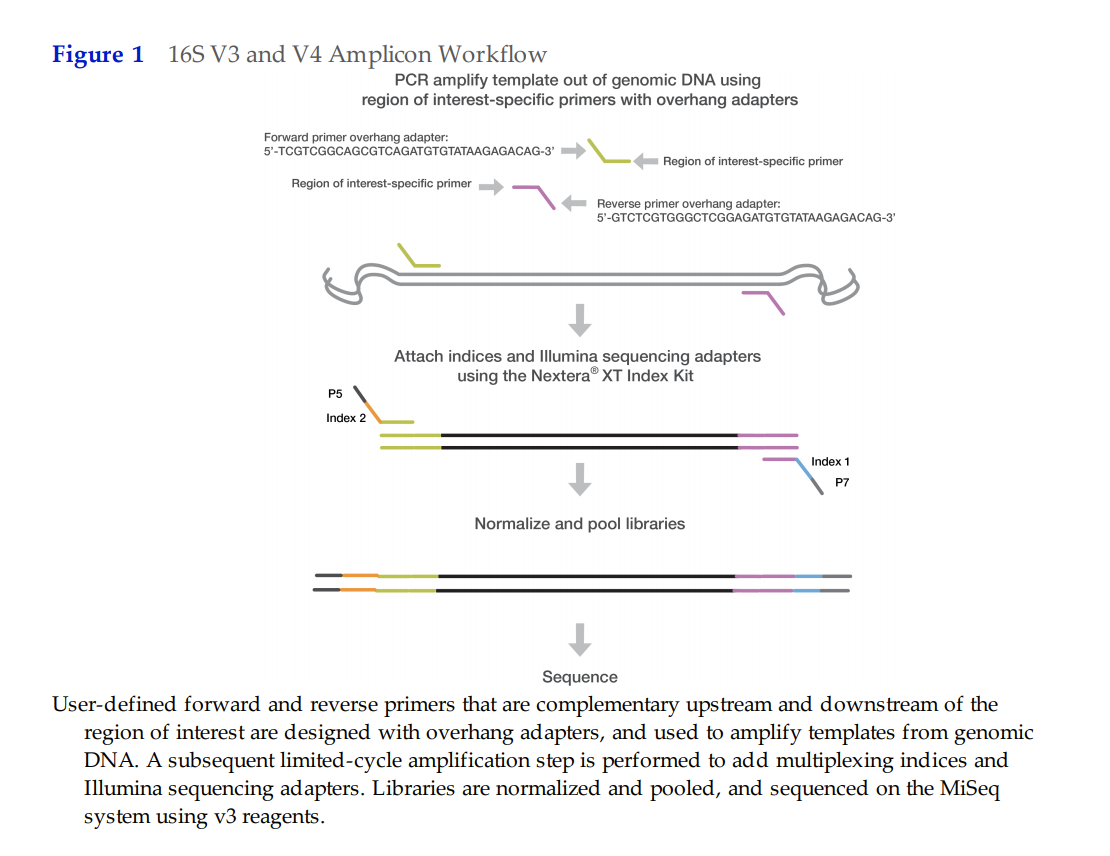
Next Gen 16S Sequencing Primer Design
URI GSC requires specific adapter sequences that are outlined below:
Forward Primer with Adapter Overhang:
5’ TCGTCGGCAGCGTCAGATGTGTATAAGAGACAG‐[locus-specific sequence]
Reverse Primer with Adapter Overhang:
5’ GTCTCGTGGGCTCGGAGATGTGTATAAGAGACAG‐[locus-specific sequence]
515F and 806RB for V4 region
Apprill et al 2015:
515F: 5’-GTG CCA GCM GCC GCG GTA A-3’
806RB: 5’-GGA CTA CNV GGG TWT CTA AT-3’
We took the primer sequences from Apprill et al 2015, and added the URI GSC specific adapter sequences (all bolded above):
| Primer | GSC Adapter Overhang | Sequence | Custom primer to be ordered (Adapter+Seq): |
|---|---|---|---|
| 515F forward | TCGTCGGCAGCGTCAGATGTGTATAAGAGACAG | GTGCCAGCMGCCGCGGTAA | TCGTCGGCAGCGTCAGATGTGTATAAGAGACAGGTGCCAGCMGCCGCGGTAA |
| 806RB reverse | GTCTCGTGGGCTCGGAGATGTGTATAAGAGACAG | GGACTACNVGGGTWTCTAAT | GTCTCGTGGGCTCGGAGATGTGTATAAGAGACAGGGACTACNVGGGTWTCTAAT |
After sequencing this, we found that we amplified the host more than the bacterial community, specifically in M. capitata. We then tried the V3/V4 region. A project sequenced with V4 region in P. aestorides went well and we did not re-sequence those.
515F Forward and 806RB Reverse (V4) amplicon size: ~253 bp sequence + 50-60 bp for primer & adapter overhang.
338F and 806RB for V3/V4 Region
We took the reverse primer we used for V4 region and the 338F from Meenatchi et al 2020.
| Primer | GSC Adapter Overhang | Primer Sequence | Sequence to be ordered: Adapter + Primer Sequence |
|---|---|---|---|
| 338F forward | TCGTCGGCAGCGTCAGATGTGTATAAGAGACAG | ACTCCTACGGGAGGCAGCA | TCGTCGGCAGCGTCAGATGTGTATAAGAGACAGACTCCTACGGGAGGCAGCA |
| 806RB reverse | GTCTCGTGGGCTCGGAGATGTGTATAAGAGACAG | GGACTACNVGGGTWTCTAAT | GTCTCGTGGGCTCGGAGATGTGTATAAGAGACAGGGACTACNVGGGTWTCTAAT |
V3/V4 amplicon size: 380–400 bp + 50-60 bp for primer & adapter overhang
WORKING Lab Protocol
Prerequisites:
- Snap-frozen or well-preserved tissue samples
- DNA extracted from tissue samples (Putnam Lab Zymo Duet RNA DNA Extraction Protocol)
- Quantity and quality of DNA checked (Quality: Gel Electrophoresis and Quantity: Qubit)
Resources:
- PCR and Gel Electrophoresis Descriptions and Troubleshooting: Strand 2017
- Khan Academy: PCR Explained
- 16s Library Prep Guide
- DNA Barcoding Explained: International Barcode of Life, Barcoding 101
Materials:
- Phusion HiFi Mastermix (Thermo Scientific F531S): https://www.fishersci.com/shop/products/phusion-high-fidelity-pcr-master-mixes/f531s
- Ultra-pure water
- 96-well plates, centrifuge, pipettes and filter tips, thermocycler
- 515F and 806RB primers with appropriate adapter overhang
- Zymoclean Gel DNA recovery kit: protocol and product link
- Gel cutting pipette tips
This protocol is based on resources from on Earth Microbiome, Apprill et al 2015, and URI GSC.
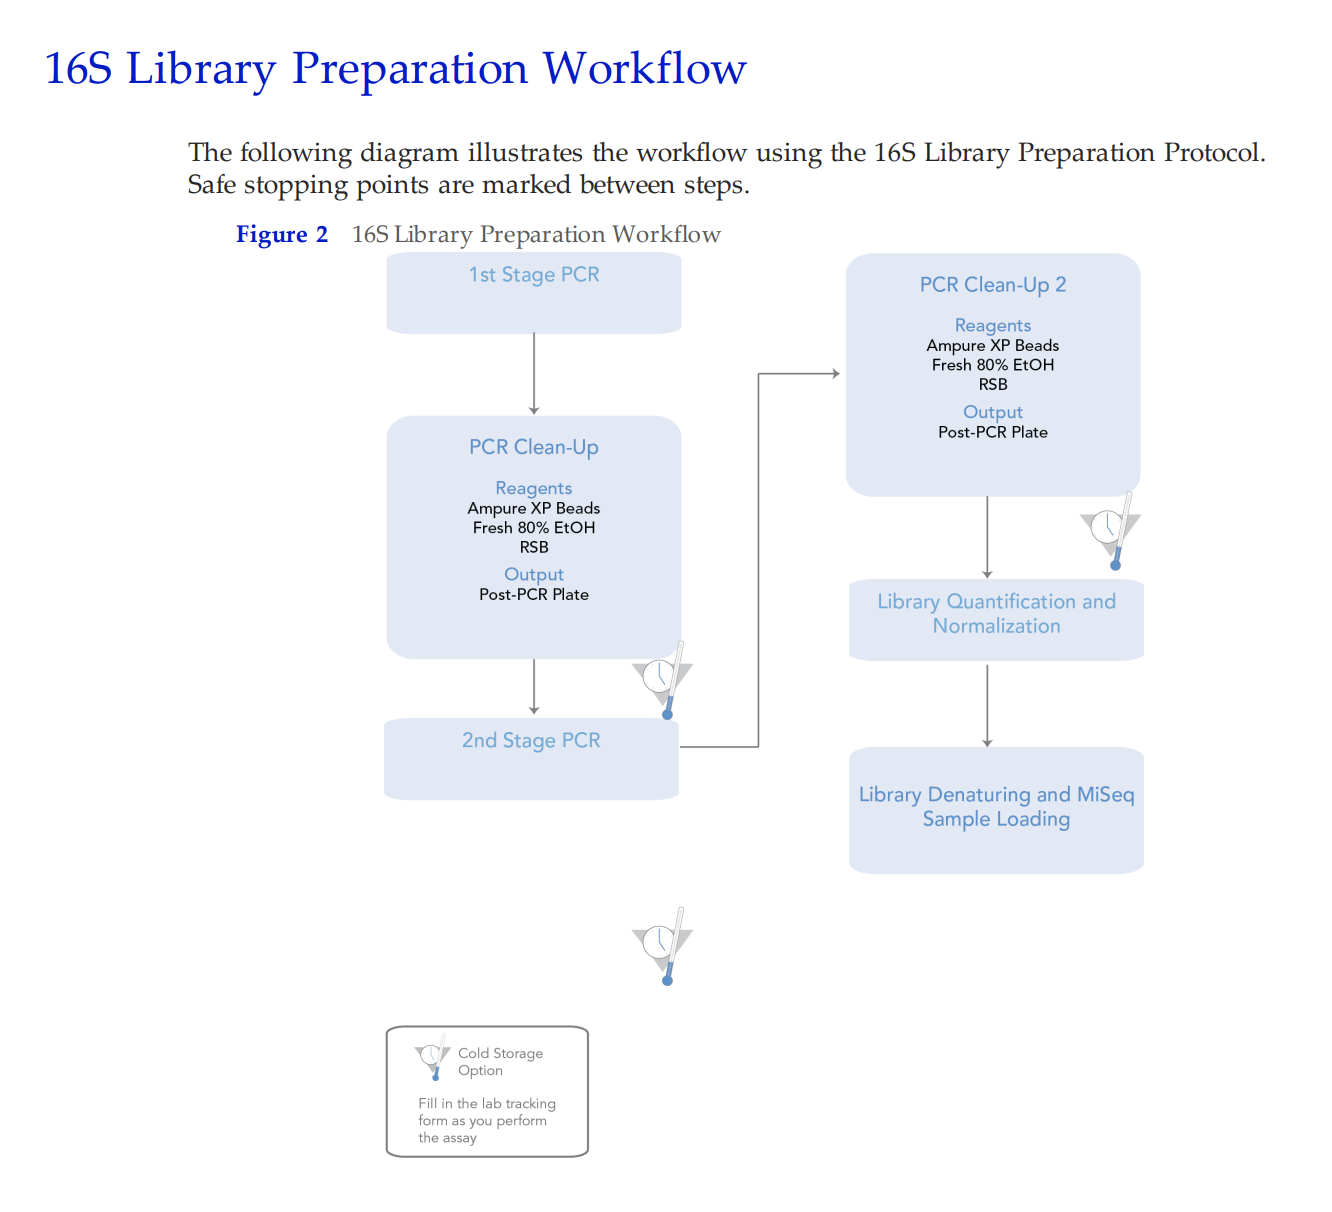
In our lab, we will complete the first PCR step and then we pay URI GSC to complete the rest of the library prep and preparation for sequencing.
Steps:
- Check concentrations with Qubit.
- Calculate volumes of DNA and water needed to dilute sample to 4 ng/μl concentration in 20 μl. 4 ng is the minimum input to be used for one reaction. In this protocol, samples will be run in triplicate with each reaction containing 4 ng for a sample total of 12 ng. Dilutions can be done in any volume, but we recommend 10 or 20 μl depending on your starting concentration.
| Sample ID | DNA (ng_μl) | DNA for dilution (μl) | Water for Dilution (μl) |
|---|---|---|---|
| Example | Qubit value | =40/Qubit value | 10 - DNA for dilution value |
| Coral 1 | 37.4 | 1.07 | 8.93 |
To calculate the DNA sample volume needed for the dilution in 10µl for example, use the following equation: V1M1=V2M2.
V1(Qubit value)=(4 ng/μl)(10 μl)
V1=40/Qubit value
Finally, to calculate the volume of water needed, subtract the DNA volume required from 10 μl.
- Aliquot the appropriate volume of ultra pure water needed for dilution (for Coral 1, 8.93 μl) into each appropriately labeled PCR strip tube or well in a 96-well plate. To maximize efficiency, copy the PCR plate setup from Step 11 and the example image. Column 1 in the PCR 96-well plate should be the same as column 1 in the dilution plate so that you can use the multi-channel pipette to add 3 uL in Step 8.
- Aliquot the appropriate volume of DNA sample needed for dilution (for Coral 1, 1.07 μl).
10 ng is widely used as a general starting point, this is usually enough DNA to amplify your desired gene. If the sample is suspected to contain more inhibitors, decrease this starting value. If the sample is not amplifying, a troubleshooting option is to decrease and increase this value. Starting with 10 ng in one 100 μl well that is split into triplicate wells for the PCR steps, 3.33 ng of DNA is needed per reaction (3.33 ng in 33 uL per reaction). Standardize the DNA concentration of each sample prior to amplification.
- Make positive mixture control by adding 0.5 μl of each sample into its own well (if doing dilutions on plates) or tube (if doing dilutions in PCR strip tubes).
- Make master mix stock solution. Forward and reverse primers will come in 100 uM stock solutions, dilute this to 10 uM. Keep master mix stock solution on ice.
- Multiply the below values by the number of samples (x # number of replicates) plus negative controls and buffer room for error (i.e. (8 samples x 3 replicates) + 1 negative control + 0.5 for error = 25.5 reactions). The amount you include for error will depend on your comfortability and experience level with pipetting.
Master Mix calculations (per reaction):
| 25µl RXN | 24 uL MM + 1 uL DNA | ||
|---|---|---|---|
| Reagent | Final Conc | Final Conc Units | Volume µl |
| Phusion MM | 1 | X | 12.5 |
| F primer | 10 | uM | 0.5 |
| R primer | 10 | uM | 0.5 |
| Water | 10.5 | ||
| DNA | 3.33 | ng/µl | 1 |
| 25 uL total |
Amount of Ultrapure water is determined by 24 - (Phusion PCR master mix + F primer + R primer). Amount of primer can be increased or decreased as a part of troubleshooting.
- Add 72 μl of master mix stock solution to each well.
- Add 3 μl of DNA sample (from the 3.33 ng/μl dilution mix) to each well. This will total 10 ng.
- Add 3 μl ultra pure water to one well per plate as a negative control.
- Add 3 μl of the positive mixture control to one well (total, not per plate) as a positive control.
- Set up each reaction in duplicate or triplicate for the PCR by pipette mixing and moving 25 μl of DNA/master mix solution into each neighboring empty well or PCR strip tube.
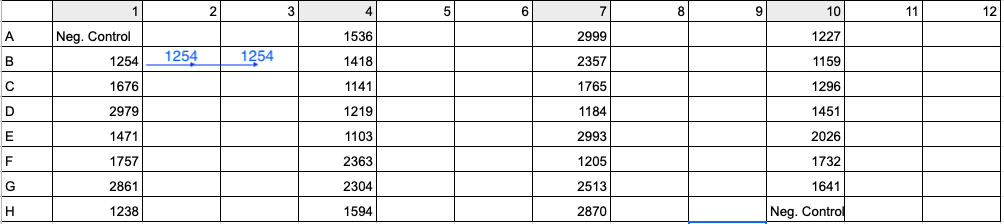
See below image for an example of 96-well plate setup with 30 samples (four digit values) and 2 negative controls (Neg. Control). To run samples in triplicate, add DNA and master mix to columns 1, 4, 7, and 10. Then in Step 11 above and image below, move 33 uL of Sample 1254’s reaction from B1 to B2 and 33 uL of reaction from B1 to B3. Use a multi-channel pipette to save time and energy.
- Spin down plate.
- Run the following PCR program (this cycle program is specific to 16S primer region):
The annealing temperature in this PCR program is specific to the melting point of your primers. A general rule of thumb is to begin with an annealing temperature 3–5°C lower than the lowest Tm of the primers.
515F order sheet from IDT - Tm = 73.4 C
806RB order sheet from IDT - Tm = 68.8 C
We ran several trials (see end of this post) based on Apprill et al 2015 to find the annealing temperature that worked the best, which was 57 C.
338F order sheet from IDT - Tm = 71.6 C
PCR program used for V4 primers:
| Temperature | Time | Repeat |
|---|---|---|
| 95 °C | 2 min | 1 |
| *95 °C | 20 s | x35 |
| *57 °C | 15s | |
| *72 °C | 5 min | |
| 72 °C | 10 min | 1 |
PCR program used for V3/V4 primers:
| Temperature | Time | Repeat |
|---|---|---|
| 95 °C | 2 min | 1 |
| *95 °C | 20 s | x30 |
| *57 °C | 30 s | |
| *72 °C | 20 s | |
| 72 °C | 5 min | 1 |
The middle 3 steps are part of the 30 cycles: The programs goes from 95C for 20 seconds, to 55C for 30 seconds, to 72C for seconds, back to 95C and so on.
- Gel options 1.) Triplicate Gel: Run 5 μl of each product (3 per sample because the PCR was done in triplicate) on a 1% agarose gel for 45 minutes using the following Putnam Lab Gel Electrophoresis protocol to check for correct size bp product (based on your primers and region amplified). 2.) Single Gel: Run 5 μl of each pooled sample on a 1% agarose gel for 60-75 minutes.
- Pool products into PCR strip tubes (75 μl total) appropriately labeled with the sample ID. Pooling occurs only after duplicate or triplicate samples (based on if you chose duplicates or triplicates above) have successfully amplified and confirmed on the gel. These will be the PCR product stock. Store at -20°C.
- Aliquot 45 μl of each product from the PCR product stock (in Step 11) into new PCR strip tubes appropriately labeled with the sample ID. These tubes will be delivered to the sequencing center. Store at -20°C until delivering to the sequencing center. The lowest μl of product to deliver to URI GSC is 25 μl.
Example of google spreadsheet for data processing, including master mix and dilution calculations, and 96-well PCR plate maps.
Gel band excision: optional depending on sequencing plan
The URI GSC hasn’t gotten good quality DNA post-gel excision so we decided to not proceed with the following steps based on our sequencing plan. I’m leaving these in this post for others who may need them.
Start at step 17 from above protocol.
- Excise the desired gel band from the agarose gel with 1 mm x 4 mm gel band pipette tips and transferred to a 1.5 mL microcentrifuge tube.
- Add 3 volumes of Agarose Dissolving Buffer (ADB) to each volume of agarose excised from the gel (e.g. for 100 µl (mg) of agarose gel slice add 300 µl of ADB). For this project: add __ µl.
- Incubate at 37-55 °C for 5-10 minutes until the gel slice is completely dissolved.
- Transfer the melted agarose solution to a Zymo-Spin™ Column in a Collection Tube.
- Centrifuge for 60 seconds at 16,000 rcf. Discard the flow-through.
- Add 200 µl of DNA Wash Buffer to the column and centrifuge for 30 seconds. Discard the flow-through.
- Repeat the above wash step.
- Add 50 µl 10 uM Tris HCl directly to the column matrix.
- Place column into a 1.5 ml tube and centrifuge for 30 seconds at 16,000 rcf to elute DNA.
- Run 5 μl of each sample on a 1% agarose gel for 60 minutes. The goal is to see a single band instead of two (one mitochondrial and one bacterial).
Holoboint Integration 16S V4 Sample Processing
Link to sample processing google sheet. This includes dilution calculations, dilution platemaps, master mix calculations, and PCR platemaps.
We are doing all 11 timepoints: 0, 6, 12, 30 hour, and 1, 2, 4, 6, 8, 12, and 16 weeks.
In trial runs, we ran 3.33 ng/uL dilutions, but in the rest of the sample processing I decided to run 4 ng/uL for ease of calculations. This results in 12 ng total across 3 replicates (4 ng per replicate) for each sample.
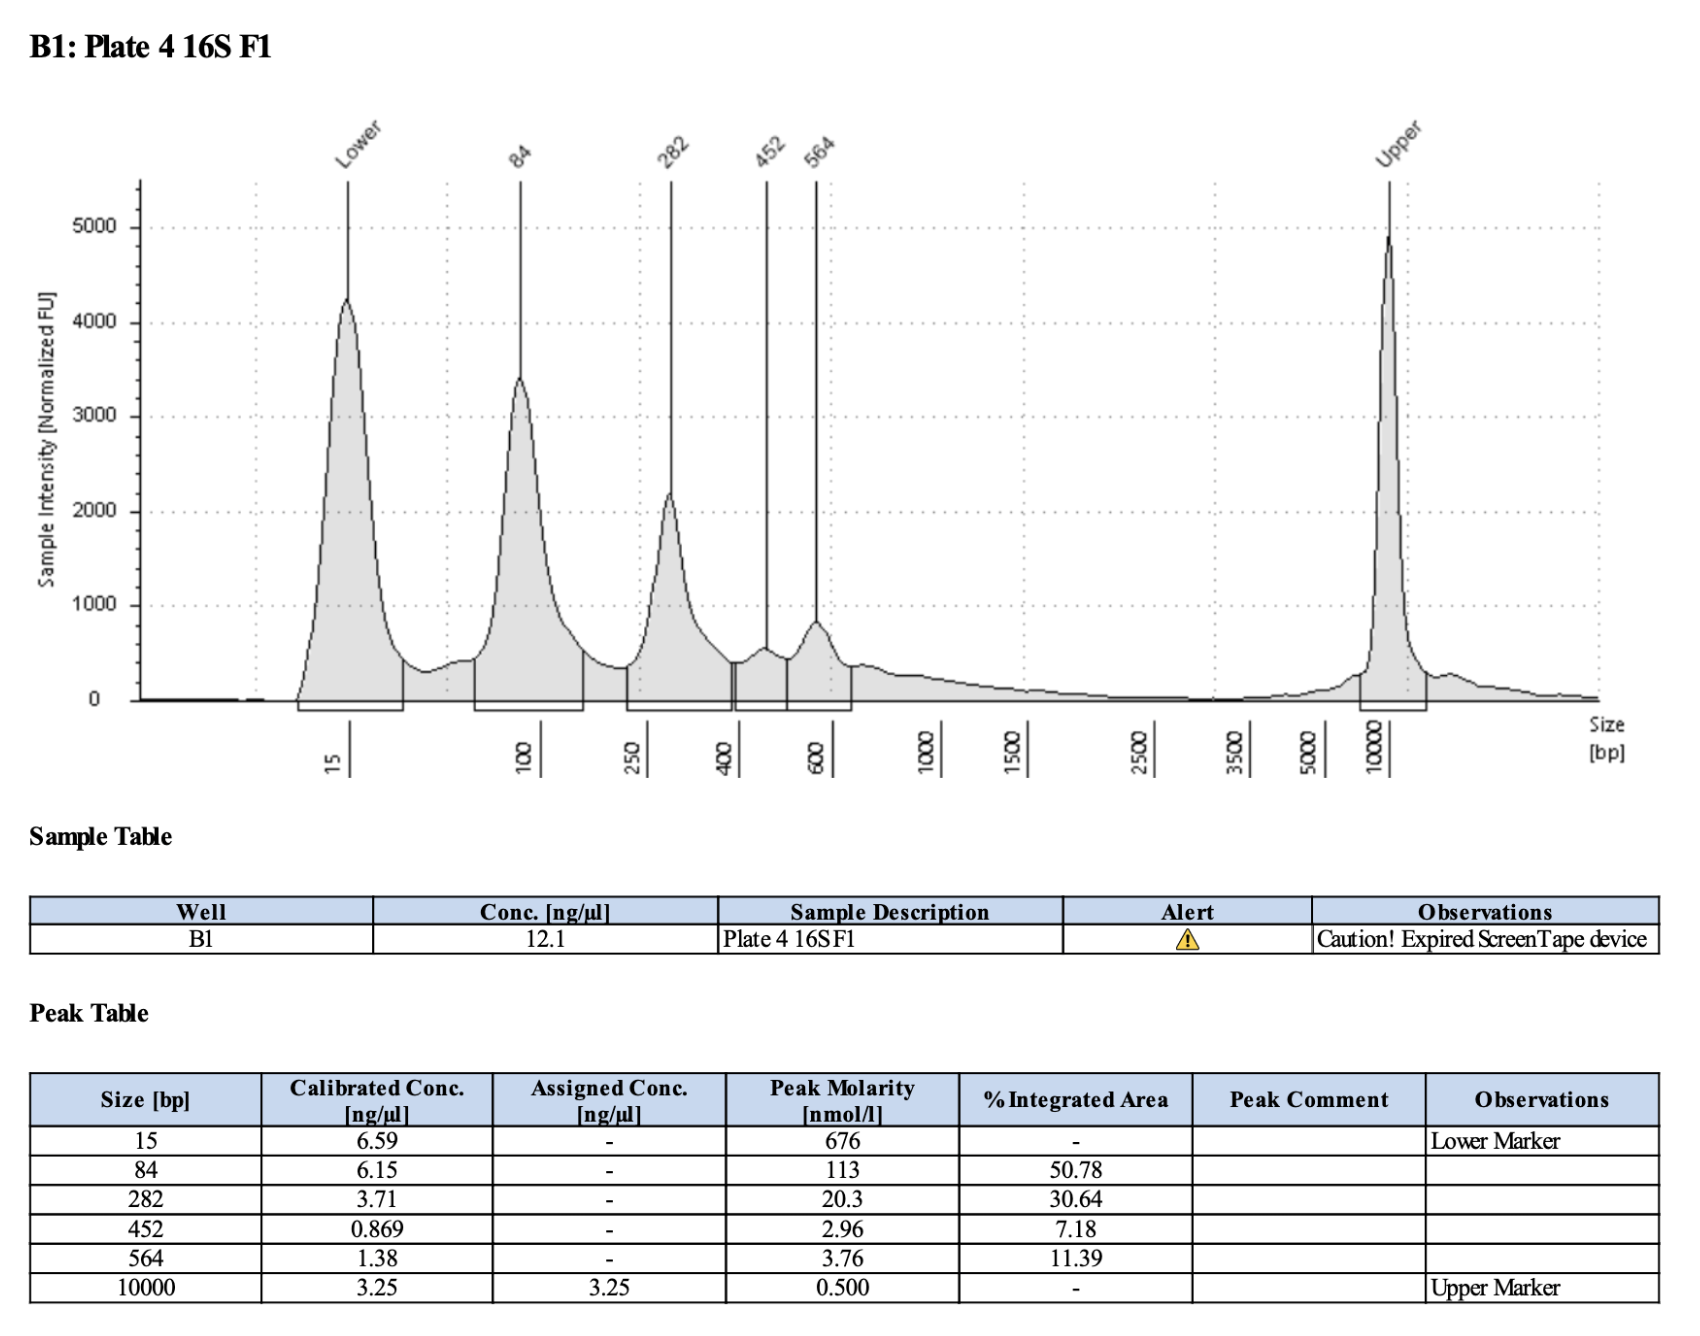
Below is 6 samples from the PCR plates run on a D5000 tapestation. All samples have a high peak at ~80-90 basepairs, which is likely primer dimer. There are 2 other peaks that can also be seen in a gel.
Full tapestation report here.
Below is a representative of the samples run on the tapestation.
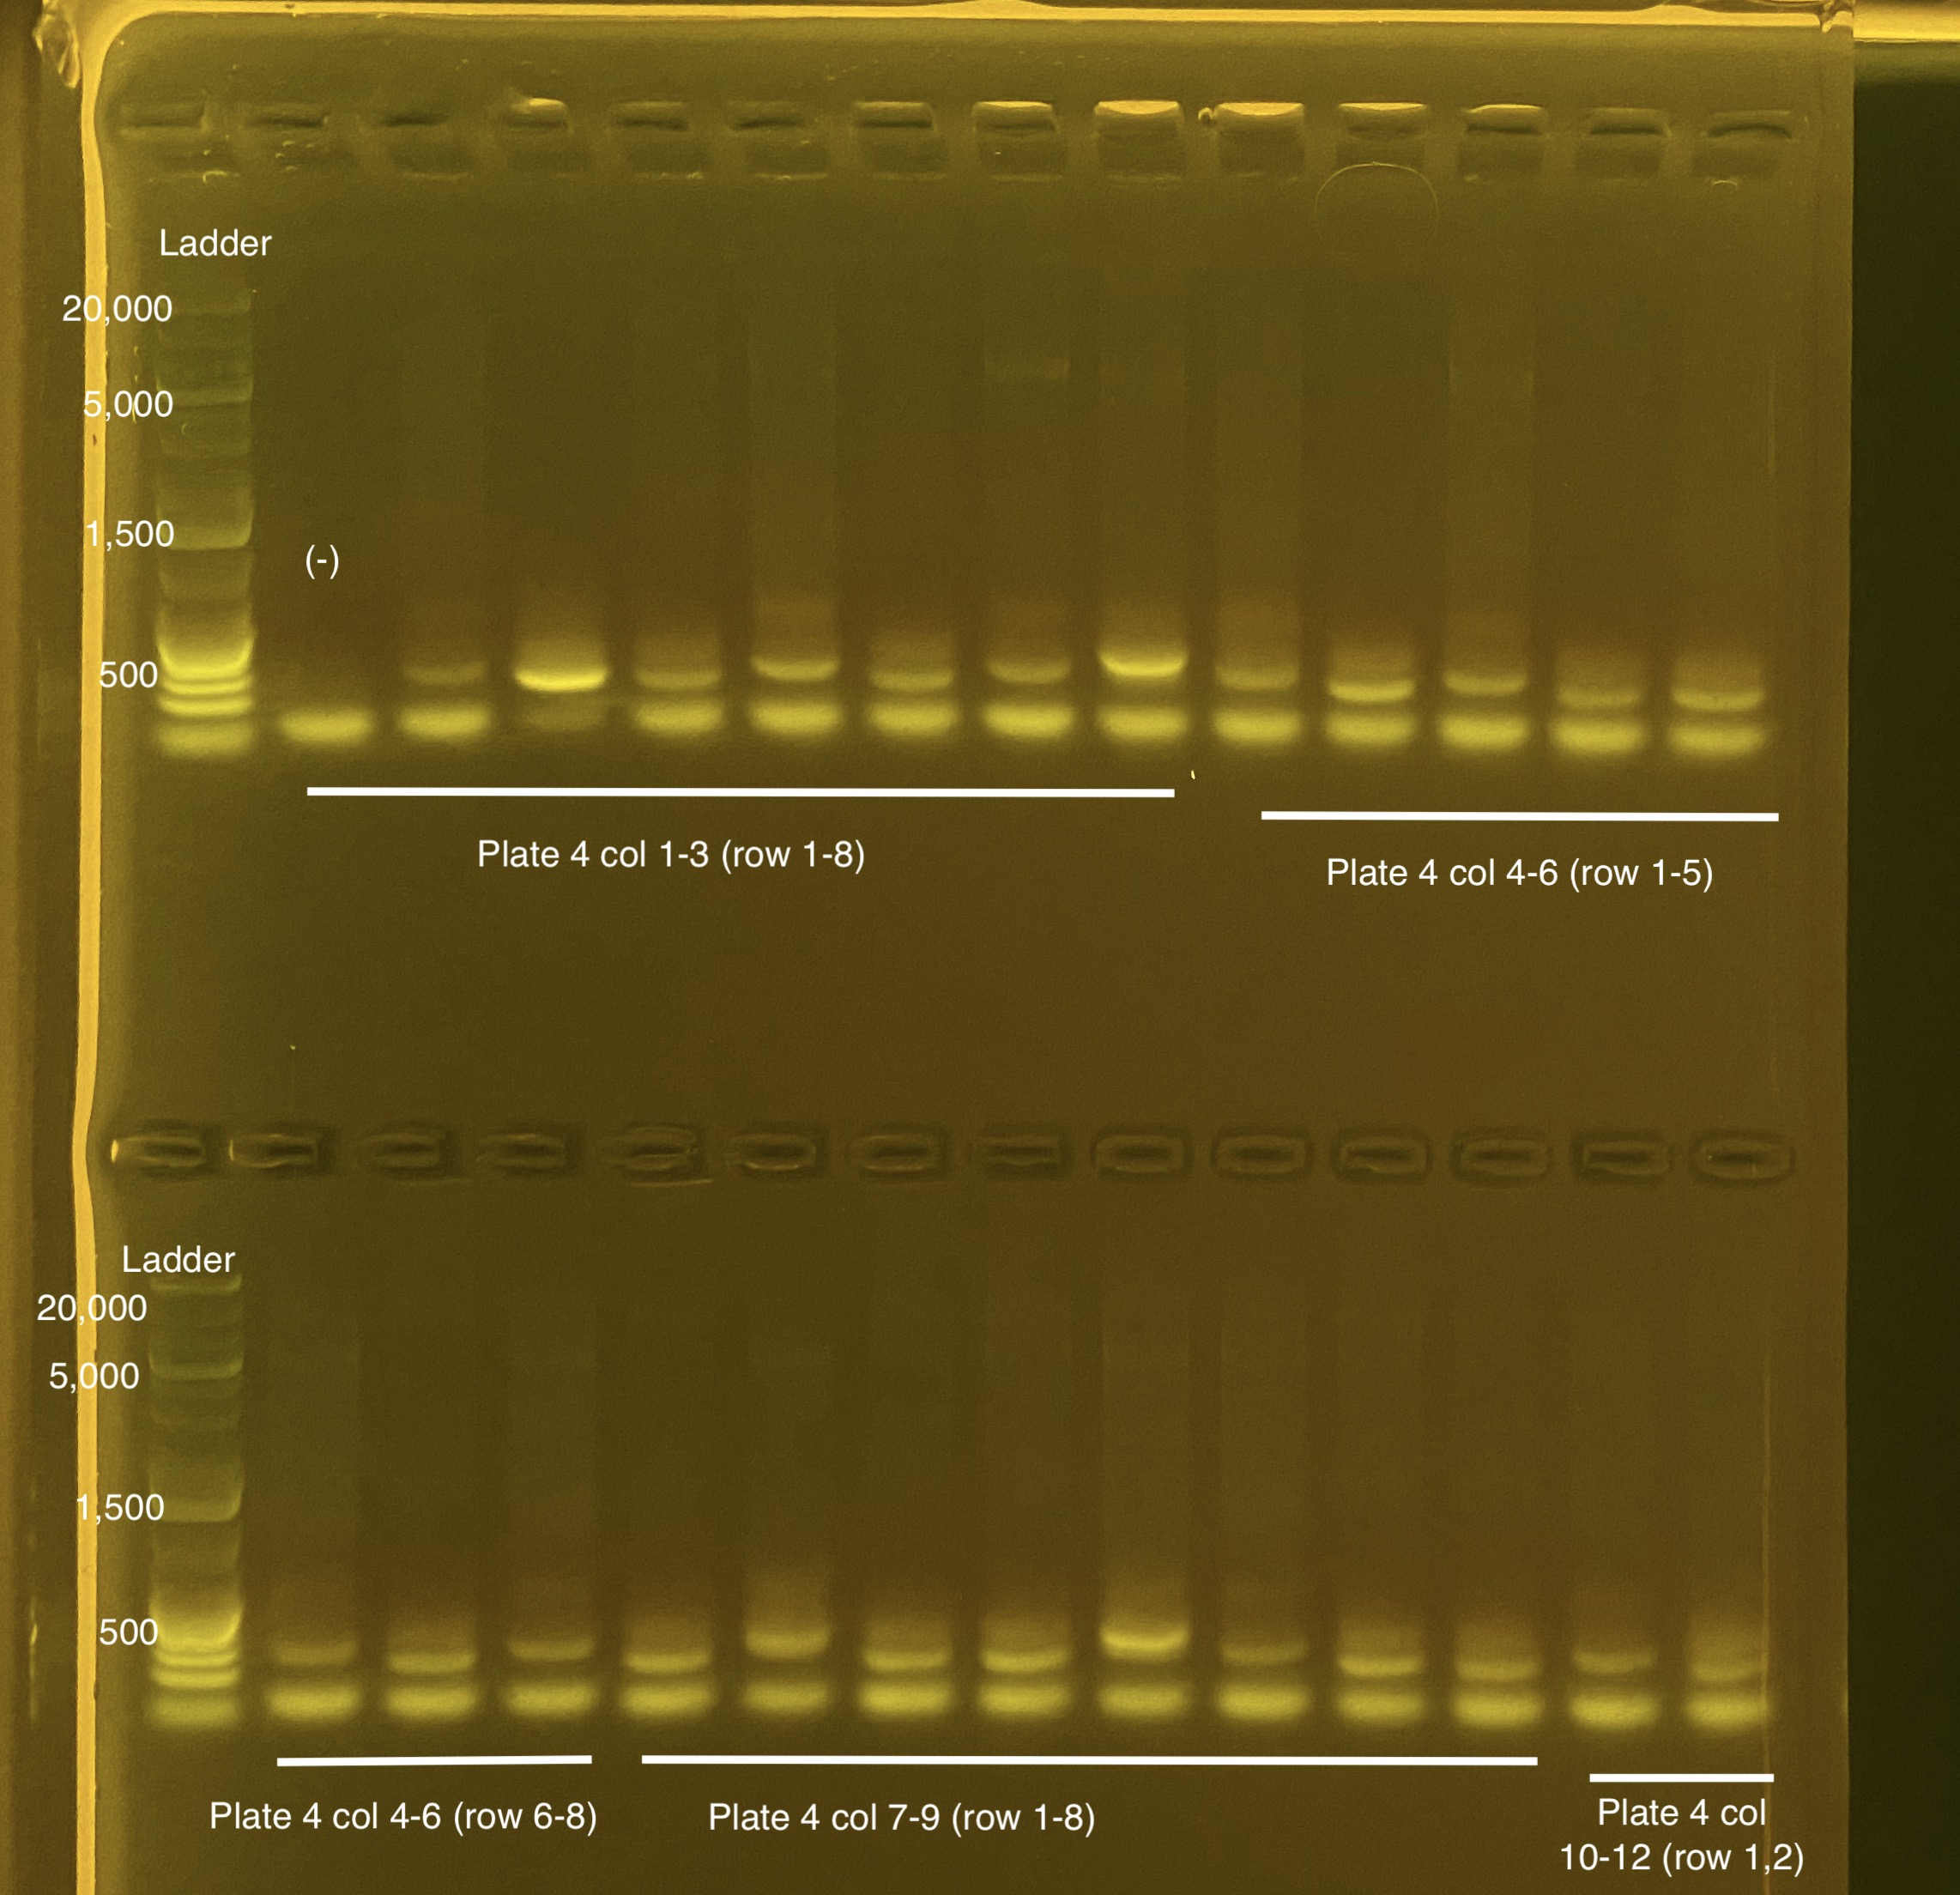
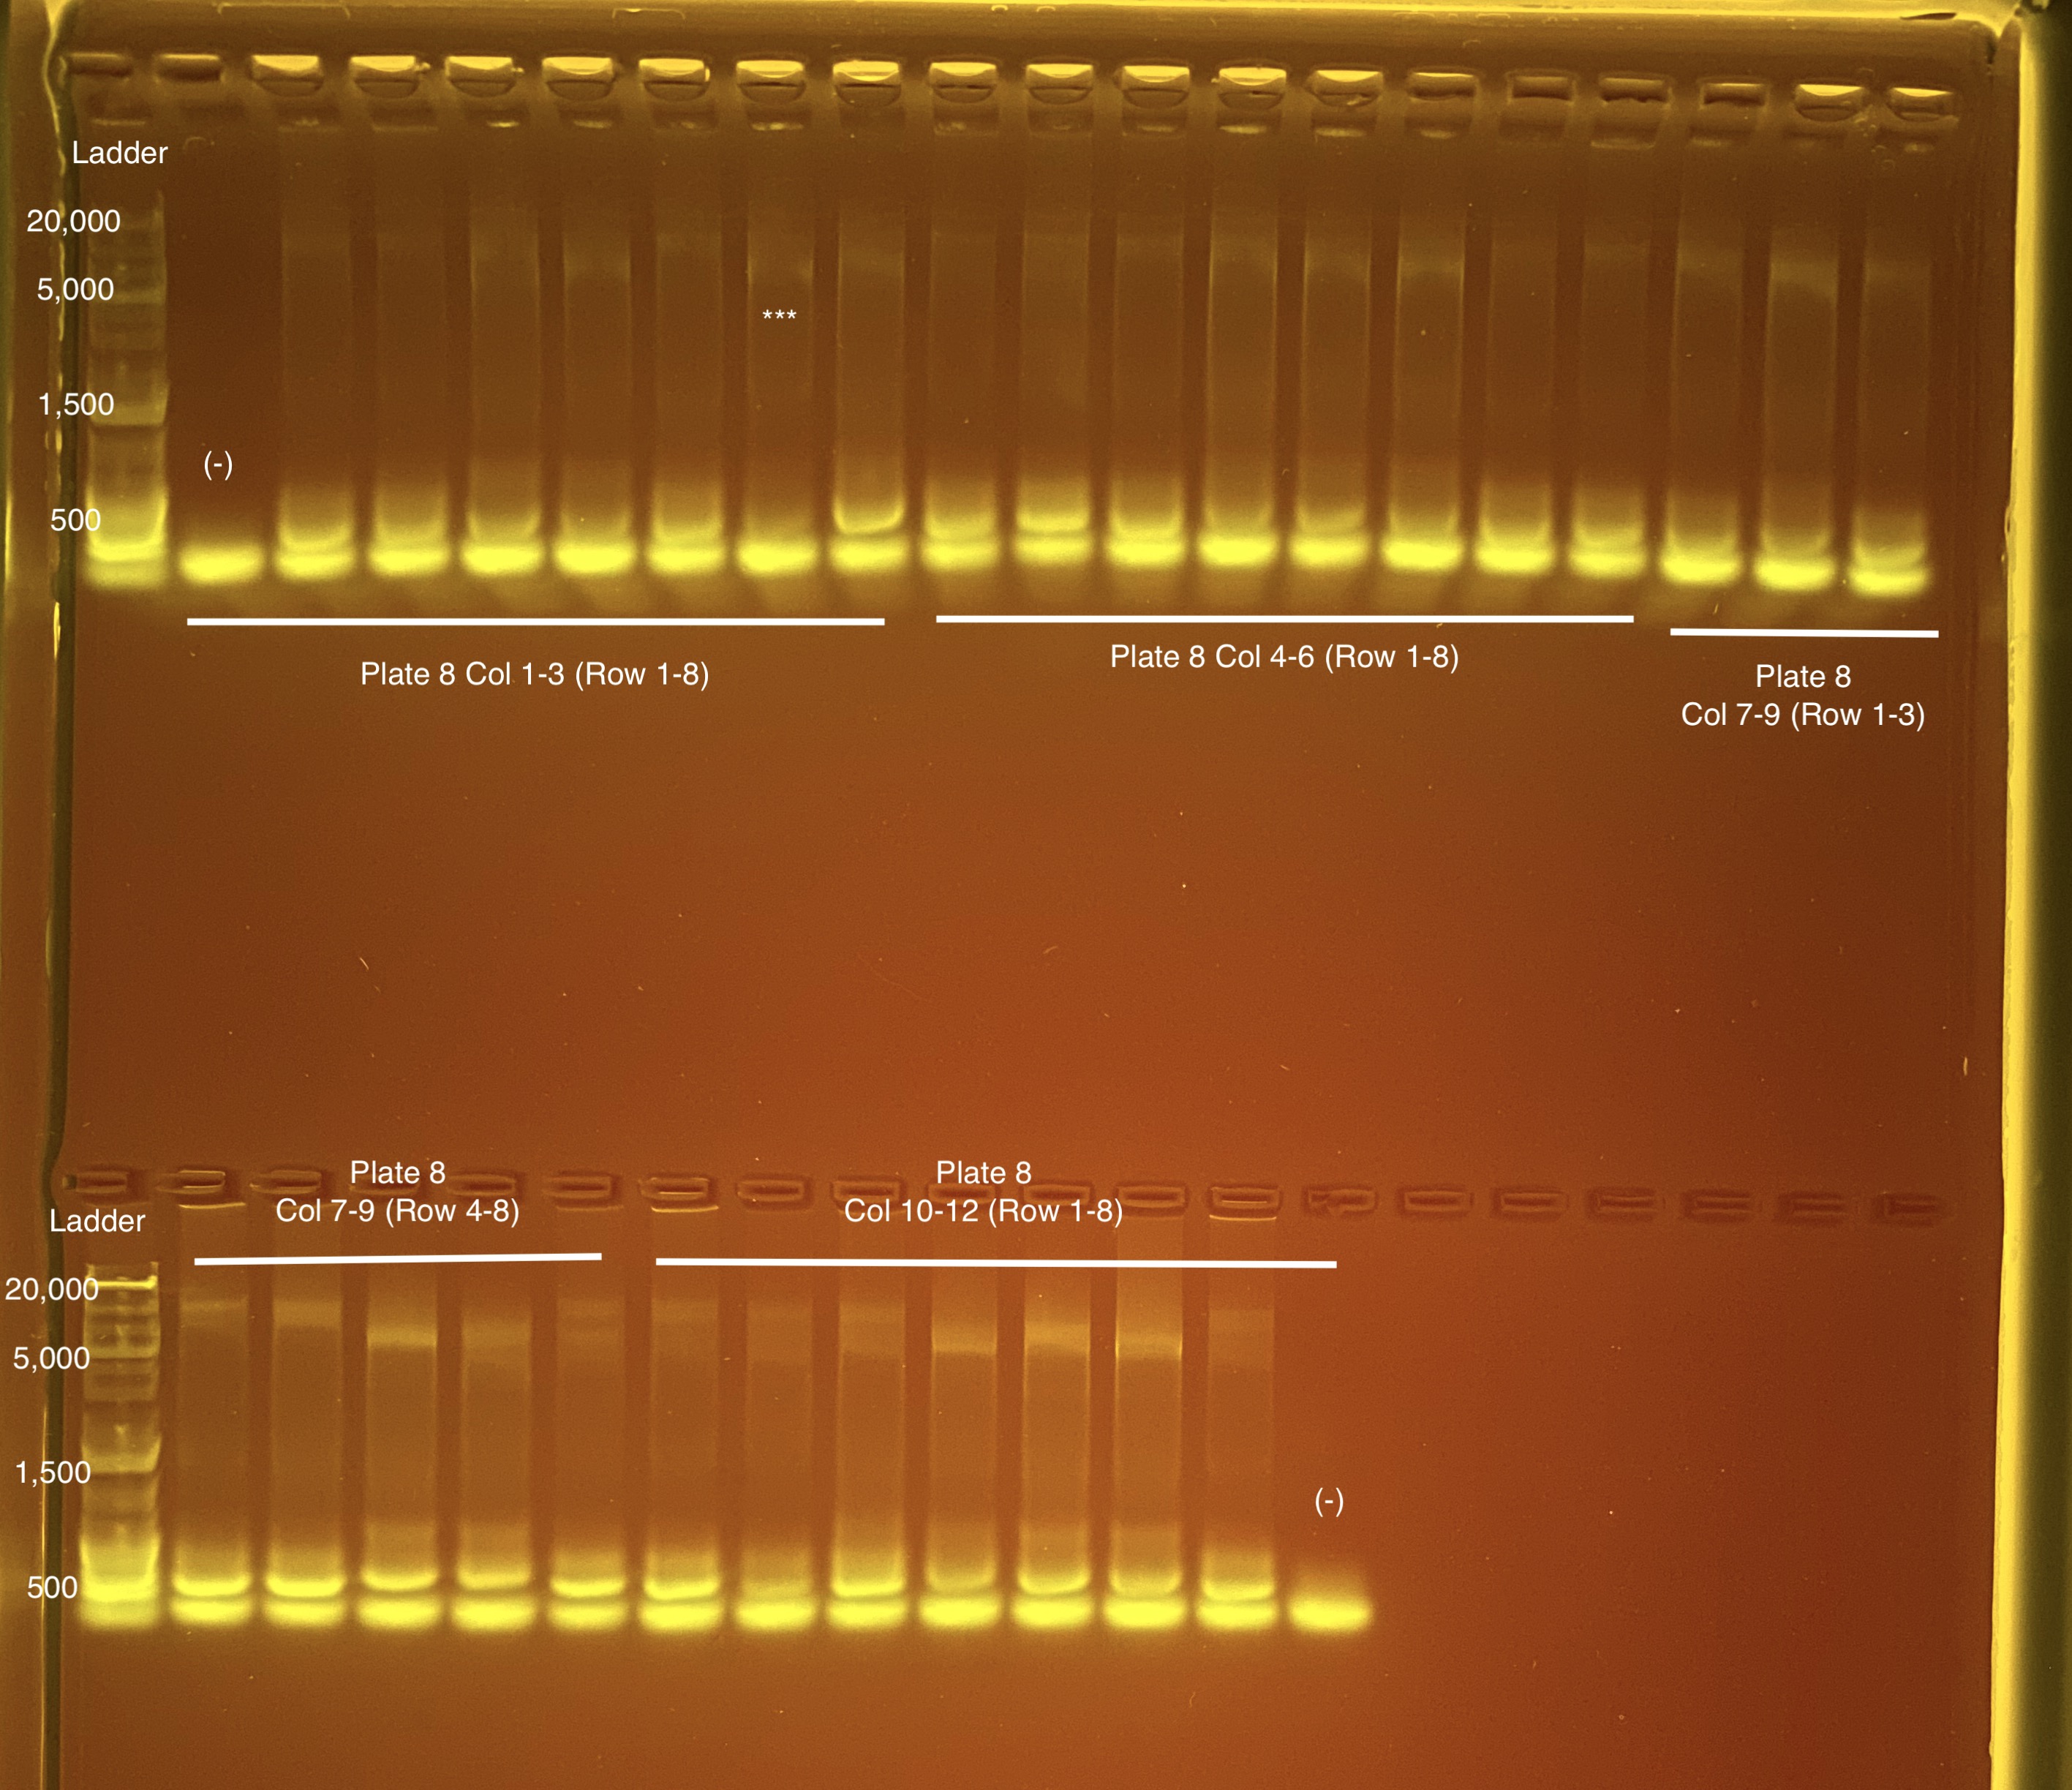
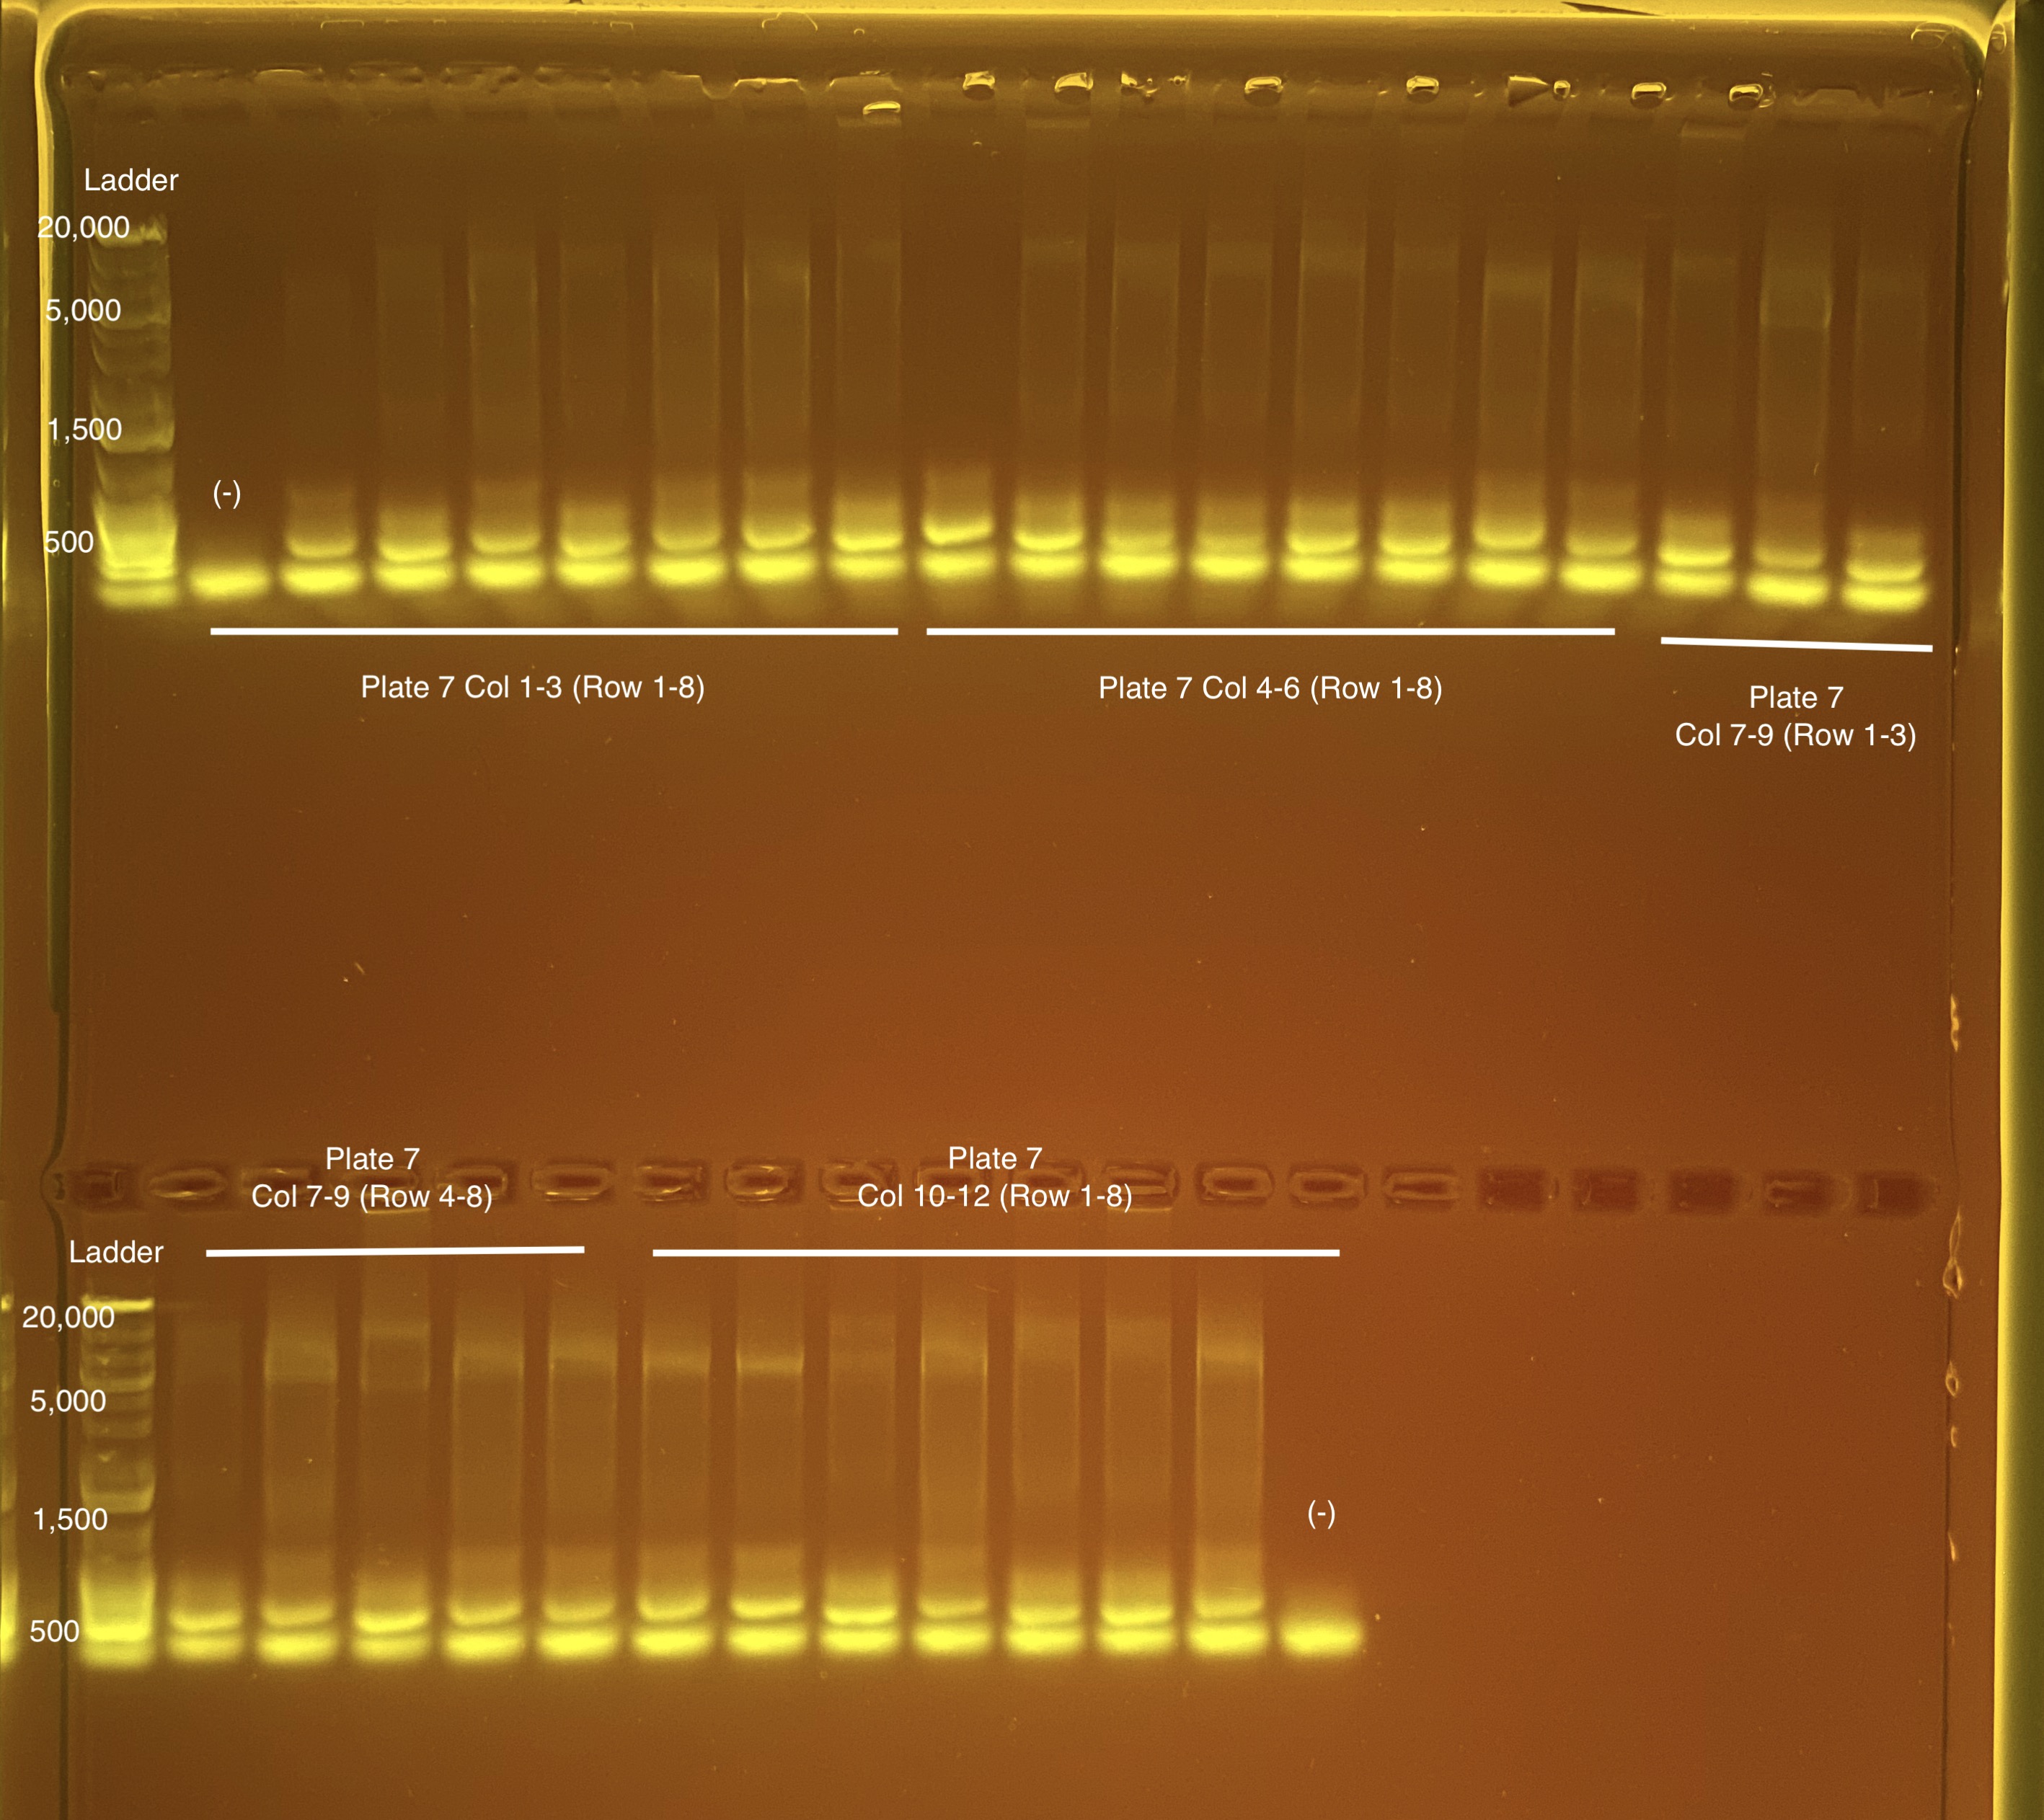
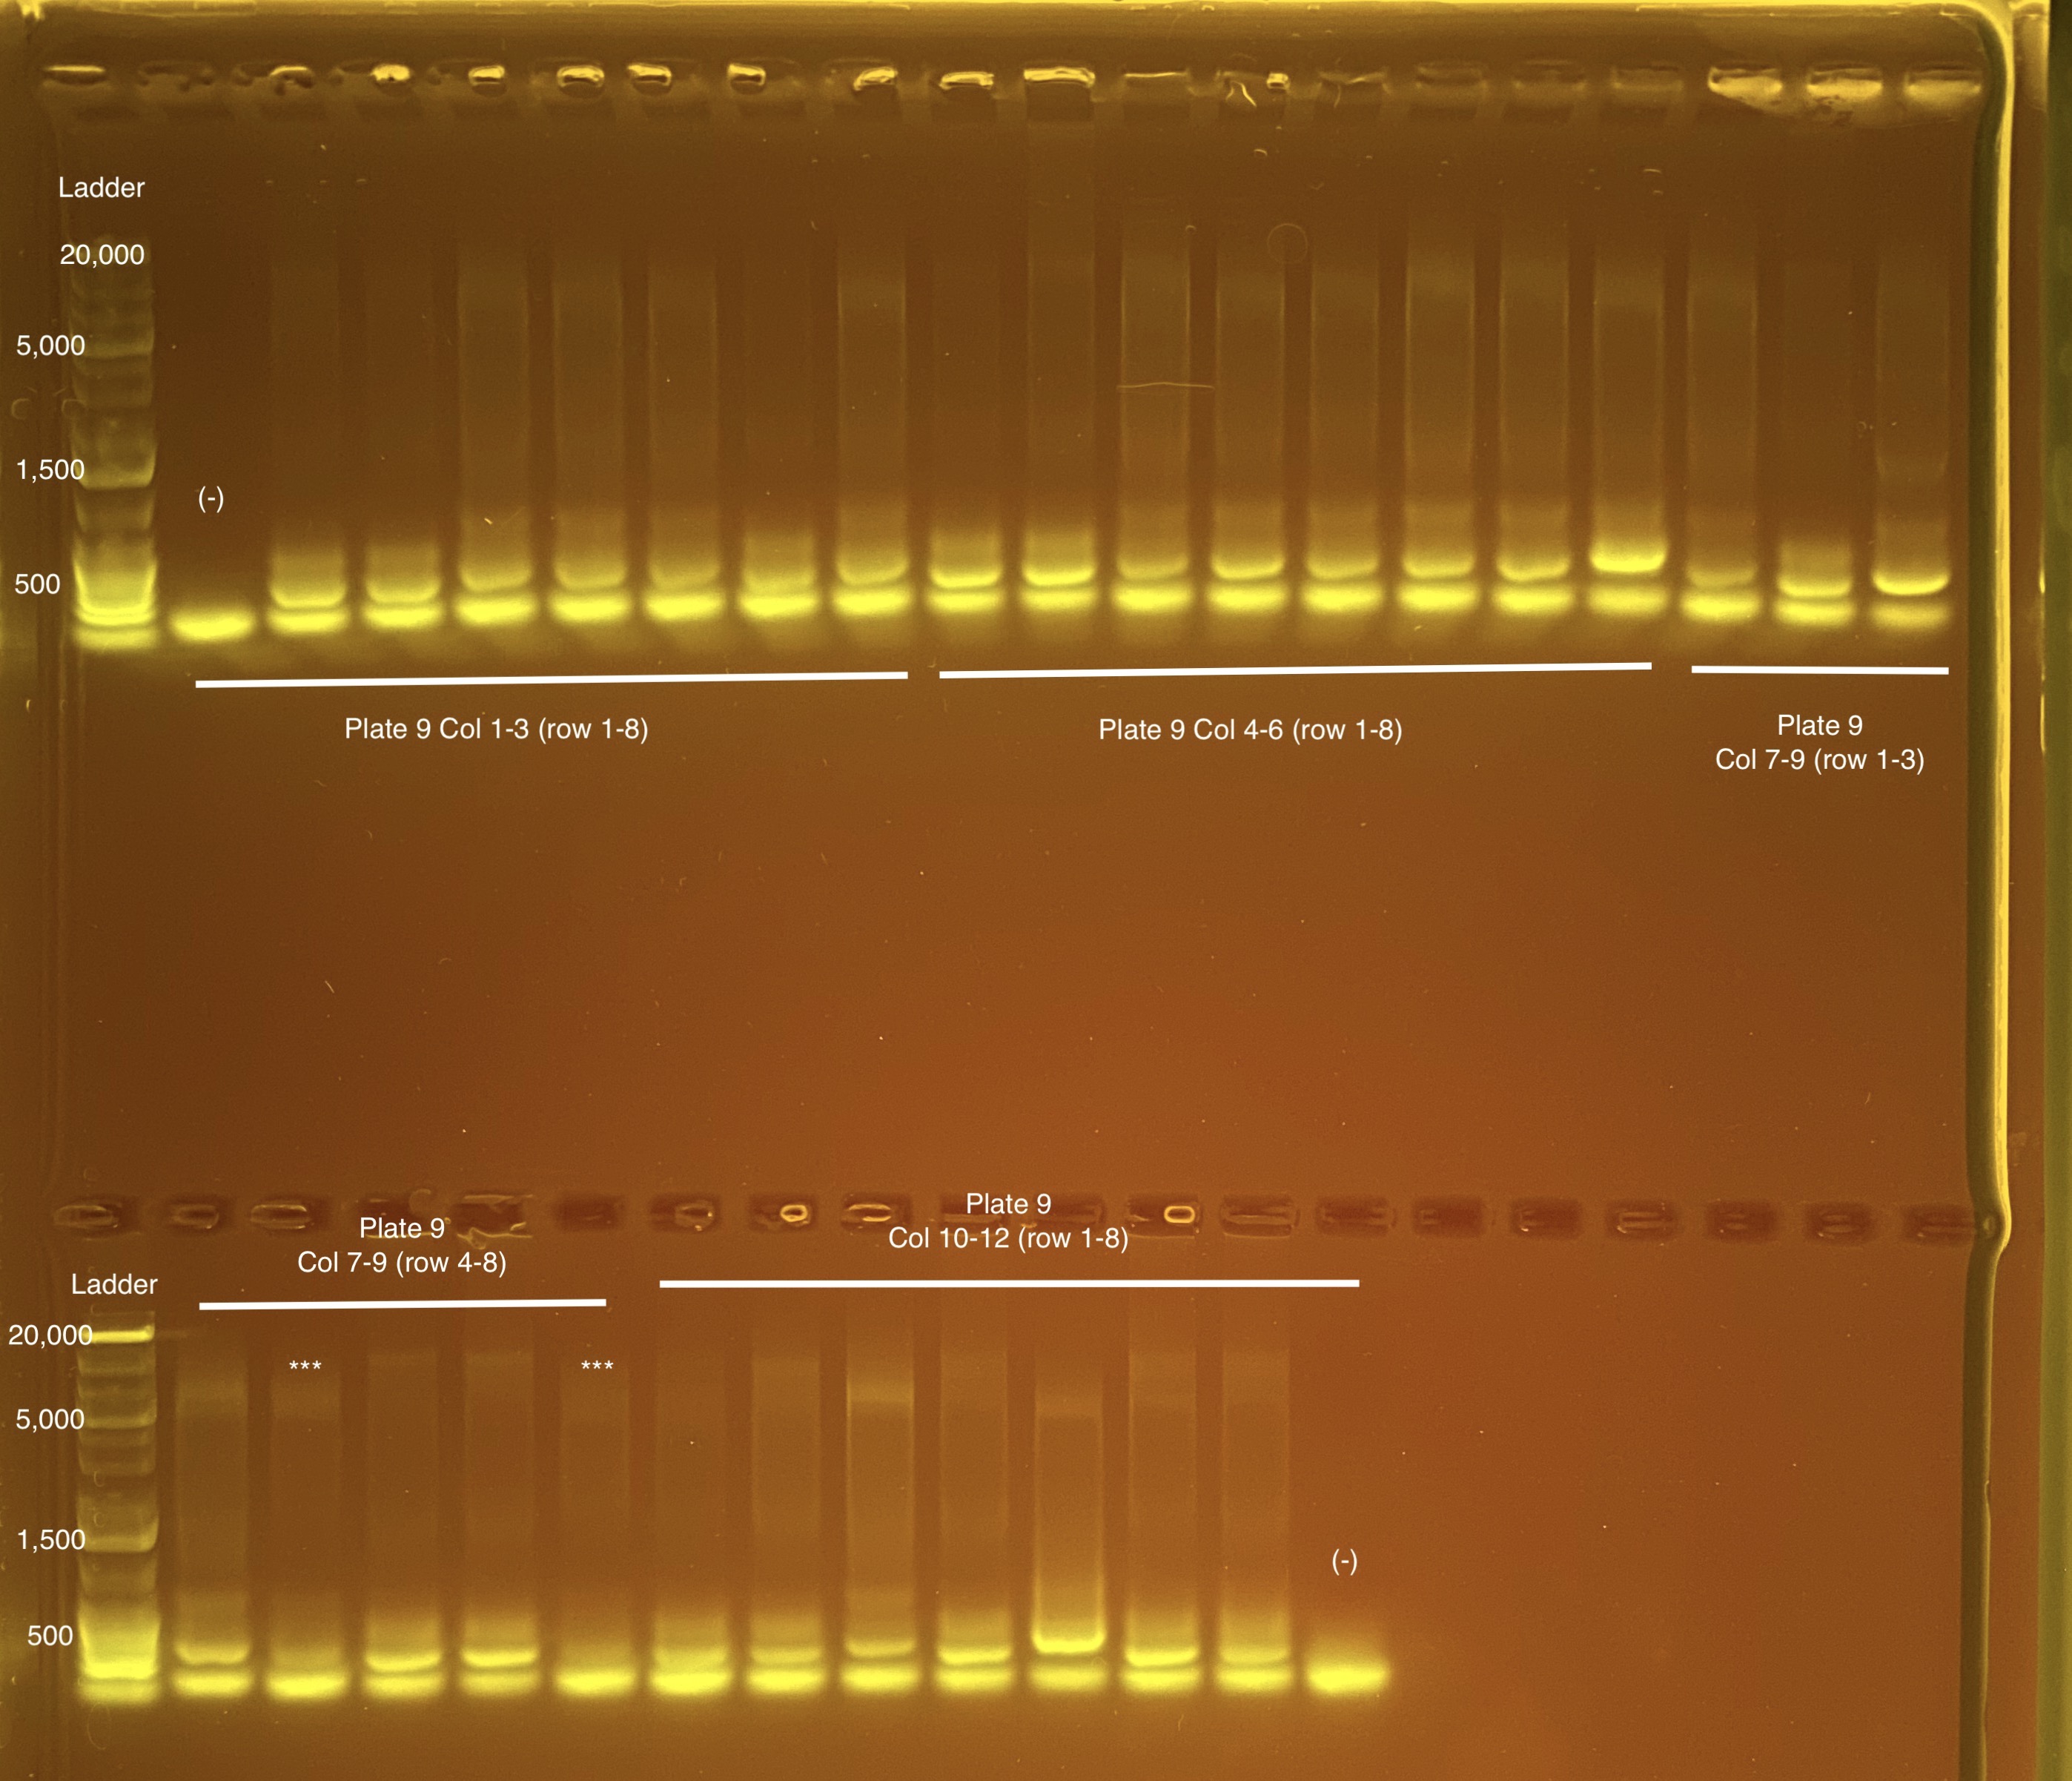
Post-Pooling Gel (1 well per sample)
See the google sheet attached above for platemaps and corresponding coral IDs.
Three asterisks denotes a sample that does not have as clear of a band - potentially re-do PCR?
A white box outline denotes a sample that did not work - either DNA was not added in dilution plate or PCR.

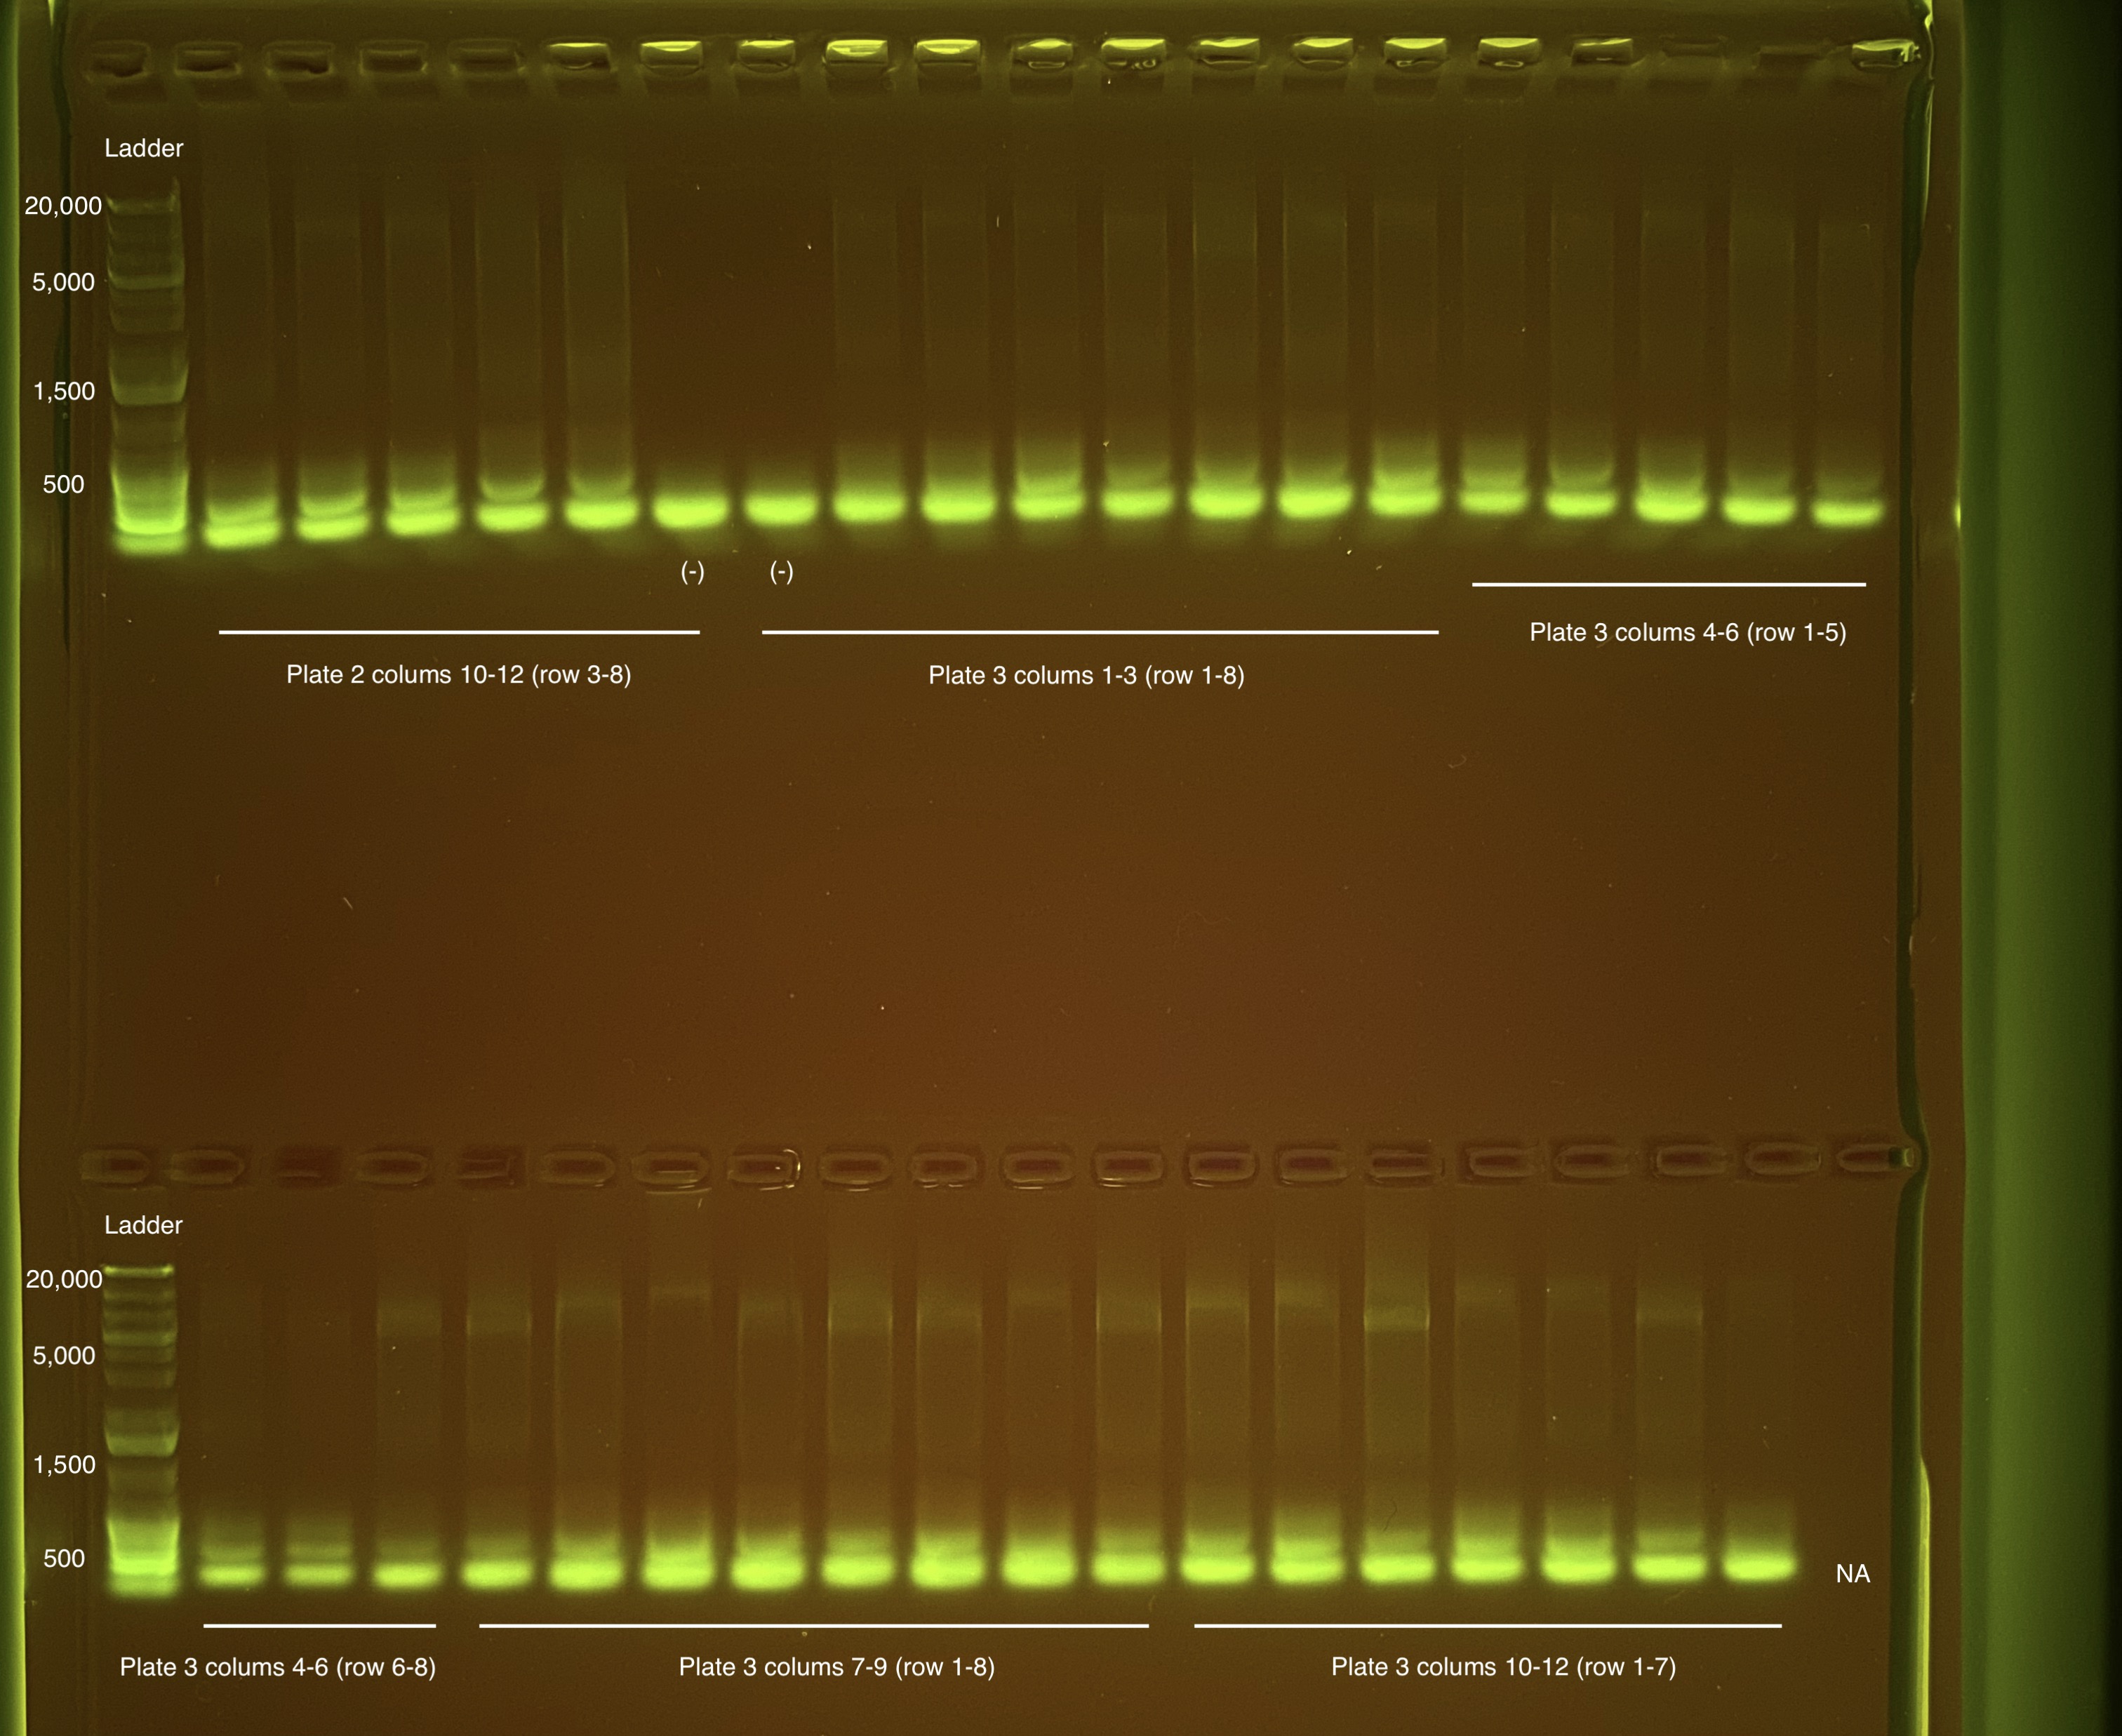

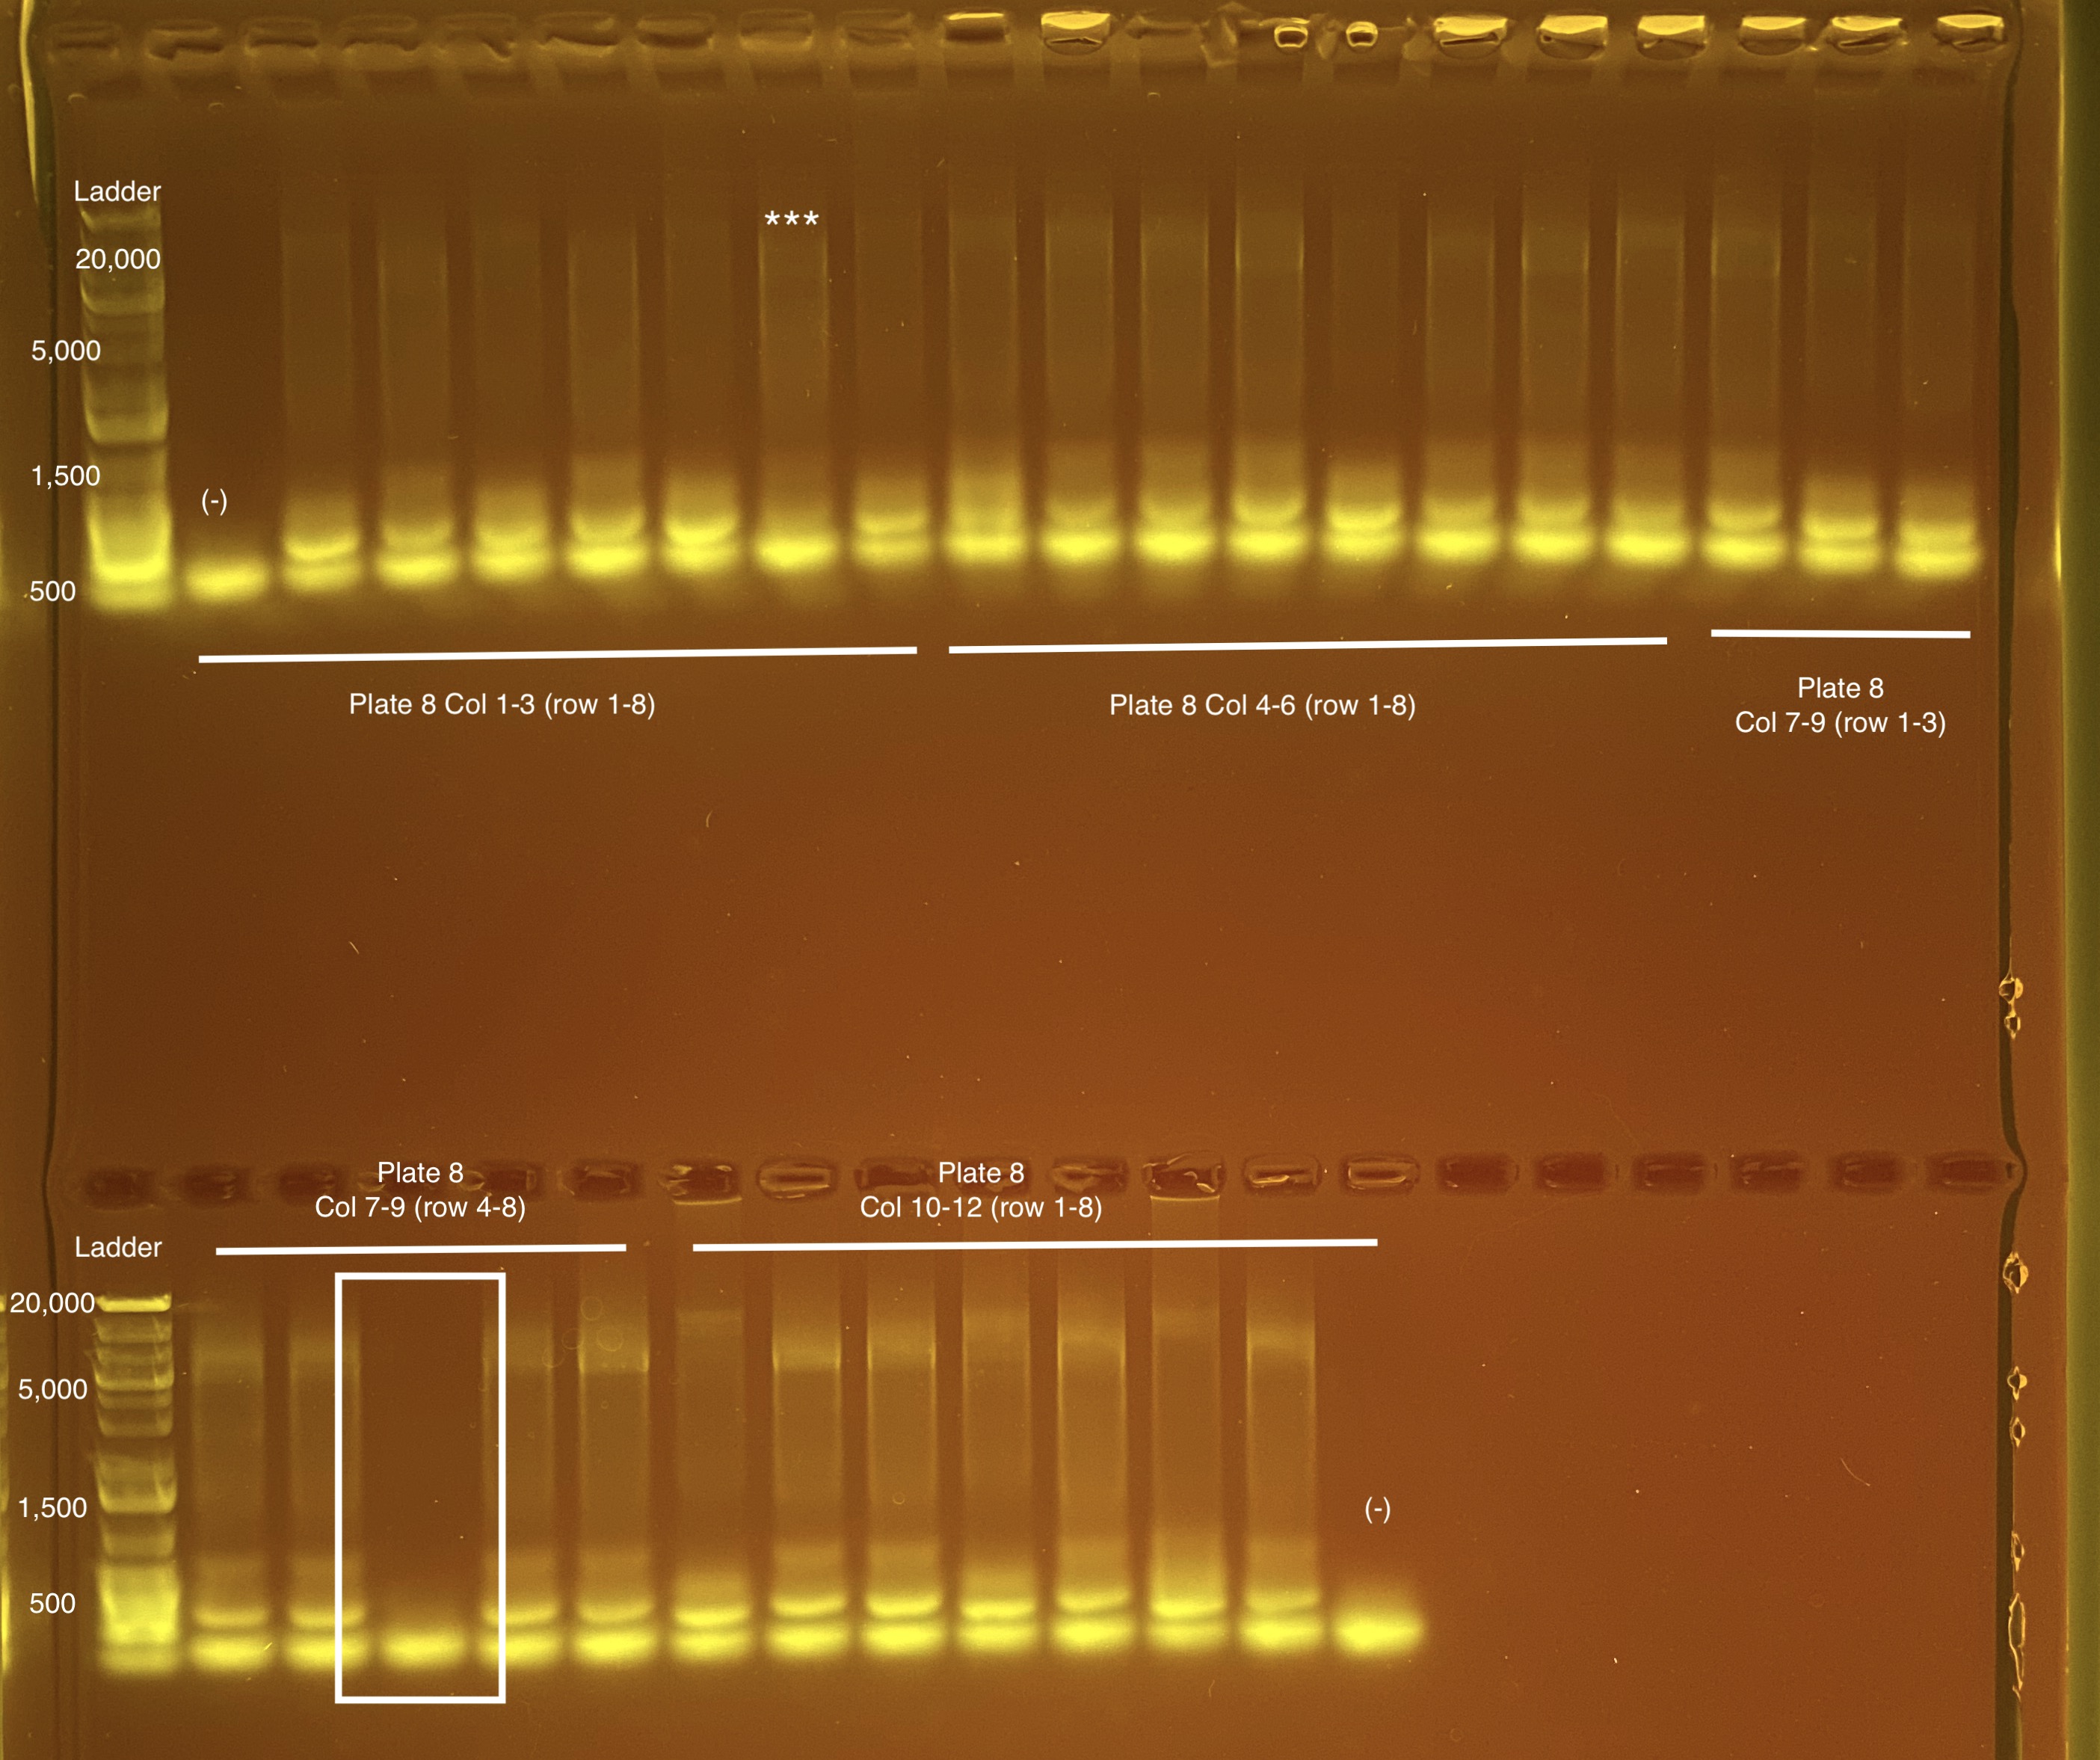
Re-do:
- Plate 8 Column 7,8,9 well 3F = 1218. Redone on 20210517 and put on plate 10 once done
Prep for URI GSC
Link to platemaps and sample list submission sheet here.
Troubleshooting “trials”
20210225 Trial Run 1
Plate 1 - 20210225
| Master Mix | uL | # of samples (8 + 0.5 for error) | total needed (uL) |
|---|---|---|---|
| Phusion PCR master mix | 50 | 8.5 | 425 |
| UltraPure water | 46 | 8.5 | 391 |
| 10uM working stock 515F primer | 2 | 8.5 | 17 |
| 10uM working stock 806RB primer | 2 | 8.5 | 17 |
The above H2O volume should have been 43 uL to equal 97 uL total not 100 uL.
| 1 | 2 | 3 | 4 | 5 | 6 | 7 | 8 | 9 | 10 | 11 | 12 | |
|---|---|---|---|---|---|---|---|---|---|---|---|---|
| A | 1321 | 1701 | 1083 | 1154 | 1581 | 2743 | 1628 | 1050 | ||||
| B | 1321 | 1701 | 1083 | 1154 | 1581 | 2743 | 1628 | 1050 | ||||
| C | 1321 | 1701 | 1083 | 1154 | 1581 | 2743 | 1628 | 1050 | ||||
| D | ||||||||||||
| E | ||||||||||||
| F | ||||||||||||
| G | ||||||||||||
| H |
20210225 gel image - 33 uL reactions pooled back together and run on gel. Run gel on triplicates next time to make sure no PCR artifact.
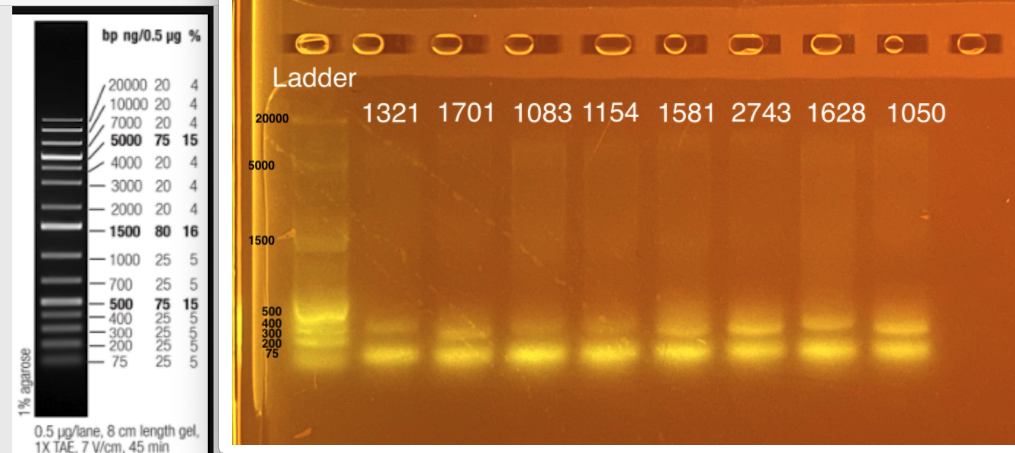
Two bands - one at ~300-350 bp (top band) and one at ~75 bp. The expected band size is 300-350 bp. What is the band at ~75 bp? This could be:
- Non specific targets; aka targeting more than our desired product
- Single vs. double strand products
- Heterozygosity at particular locus
- Primer dimer? b/c 300-350 bp is desired length and primer dimer is usually closer to 100 bp
- Mixed DNA sample - could this be picking up something in the coral or symbiont?
Next steps: I can try to increase the annealing temperature. Apprill et al had 55C. I can take 3-4 samples from above do a PCR gradient - run one at 57; one at 58; one at 59 to see if there is a difference. Make sure to include negative control next time to exclude contamination!!
Alternatively, I could up the volume of primer used. I don’t want to change the number of cycles yet because the bands are so clear.
20210302 Trial Run 2
I did a gradient of annealing temperatures (56, 57, and 58 C) and two volumes (2 and 3 uL) of primer to optimize those two portions of the protocol. Trial 1 was 55 C annealing temp and 2 uL primer.
The below program names need to edited to reflect the correct v-region.
There were 9 samples done in duplicate in 33 uL reactions (2 x 33 uL reactions) for each primer volume option. I needed a total of 18 reactions, so the master mix volume was calculated to be enough for 19.6 reactions (18 reactions + room for error). The ratios from above protocol were kept.
| Strip Tube # | Annealing Temp | Primer added | Tube 1 | Tube 2 | Tube 3 | Tube 4 | Tube 5 | Tube 6 | Program Name | Thermocyler # |
|---|---|---|---|---|---|---|---|---|---|---|
| 1 | 56 | 2 uL | 1321 | 1701 | 1083 | 1321 | 1701 | 1083 | 16s v4v5 a | 2 |
| 2 | 56 | 3 uL | 1321 | 1701 | 1083 | 1321 | 1701 | 1083 | 16s v4v5 a | 2 |
| 3 | 57 | 2 uL | 1154 | 1581 | 2743 | 1154 | 1581 | 2743 | 16s v4v5 b | 3 |
| 4 | 57 | 3 uL | 1154 | 1581 | 2743 | 1154 | 1581 | 2743 | 16s v4v5 b | 3 |
| 5 | 58 | 2 uL | 2743 | 1628 | 1050 | 2743 | 1628 | 1050 | 16s v4v5 c | 4 |
| 6 | 58 | 3 uL | 2743 | 1628 | 1050 | 2743 | 1628 | 1050 | 16s v4v5 c | 4 |
2 uL primer Master Mix calculation:
| Master Mix | uL | # of samples (X + X neg controls + X for error) | total needed (uL) |
|---|---|---|---|
| Phusion PCR master mix | 50 | 6.5 | 325 |
| UltraPure water | 46 | 6.5 | 299 |
| 10uM working stock 515F primer | 2 | 6.5 | 13 |
| 10uM working stock 806RB primer | 2 | 6.5 | 13 |
Come back to whether the above H2O volume should have been 41 uL to equal 97 uL total not 100 uL.
3 uL primer Master Mix calculation:
| Master Mix | uL | # of samples (X + X neg controls + X for error) | total needed (uL) |
|---|---|---|---|
| Phusion PCR master mix | 50 | 6.5 | 325 |
| UltraPure water | 44 | 6.5 | 286 |
| 10uM working stock 515F primer | 3 | 6.5 | 19.5 |
| 10uM working stock 806RB primer | 3 | 6.5 | 19.5 |
Come back to whether the above H2O volume should have been 41 uL to equal 97 uL total not 100 uL.
I made a new 806RB 10 uM diluted primer with 25 uL of 200 uM primer stock and 475 uL UP H2O. The original diluted primer was contaminated.
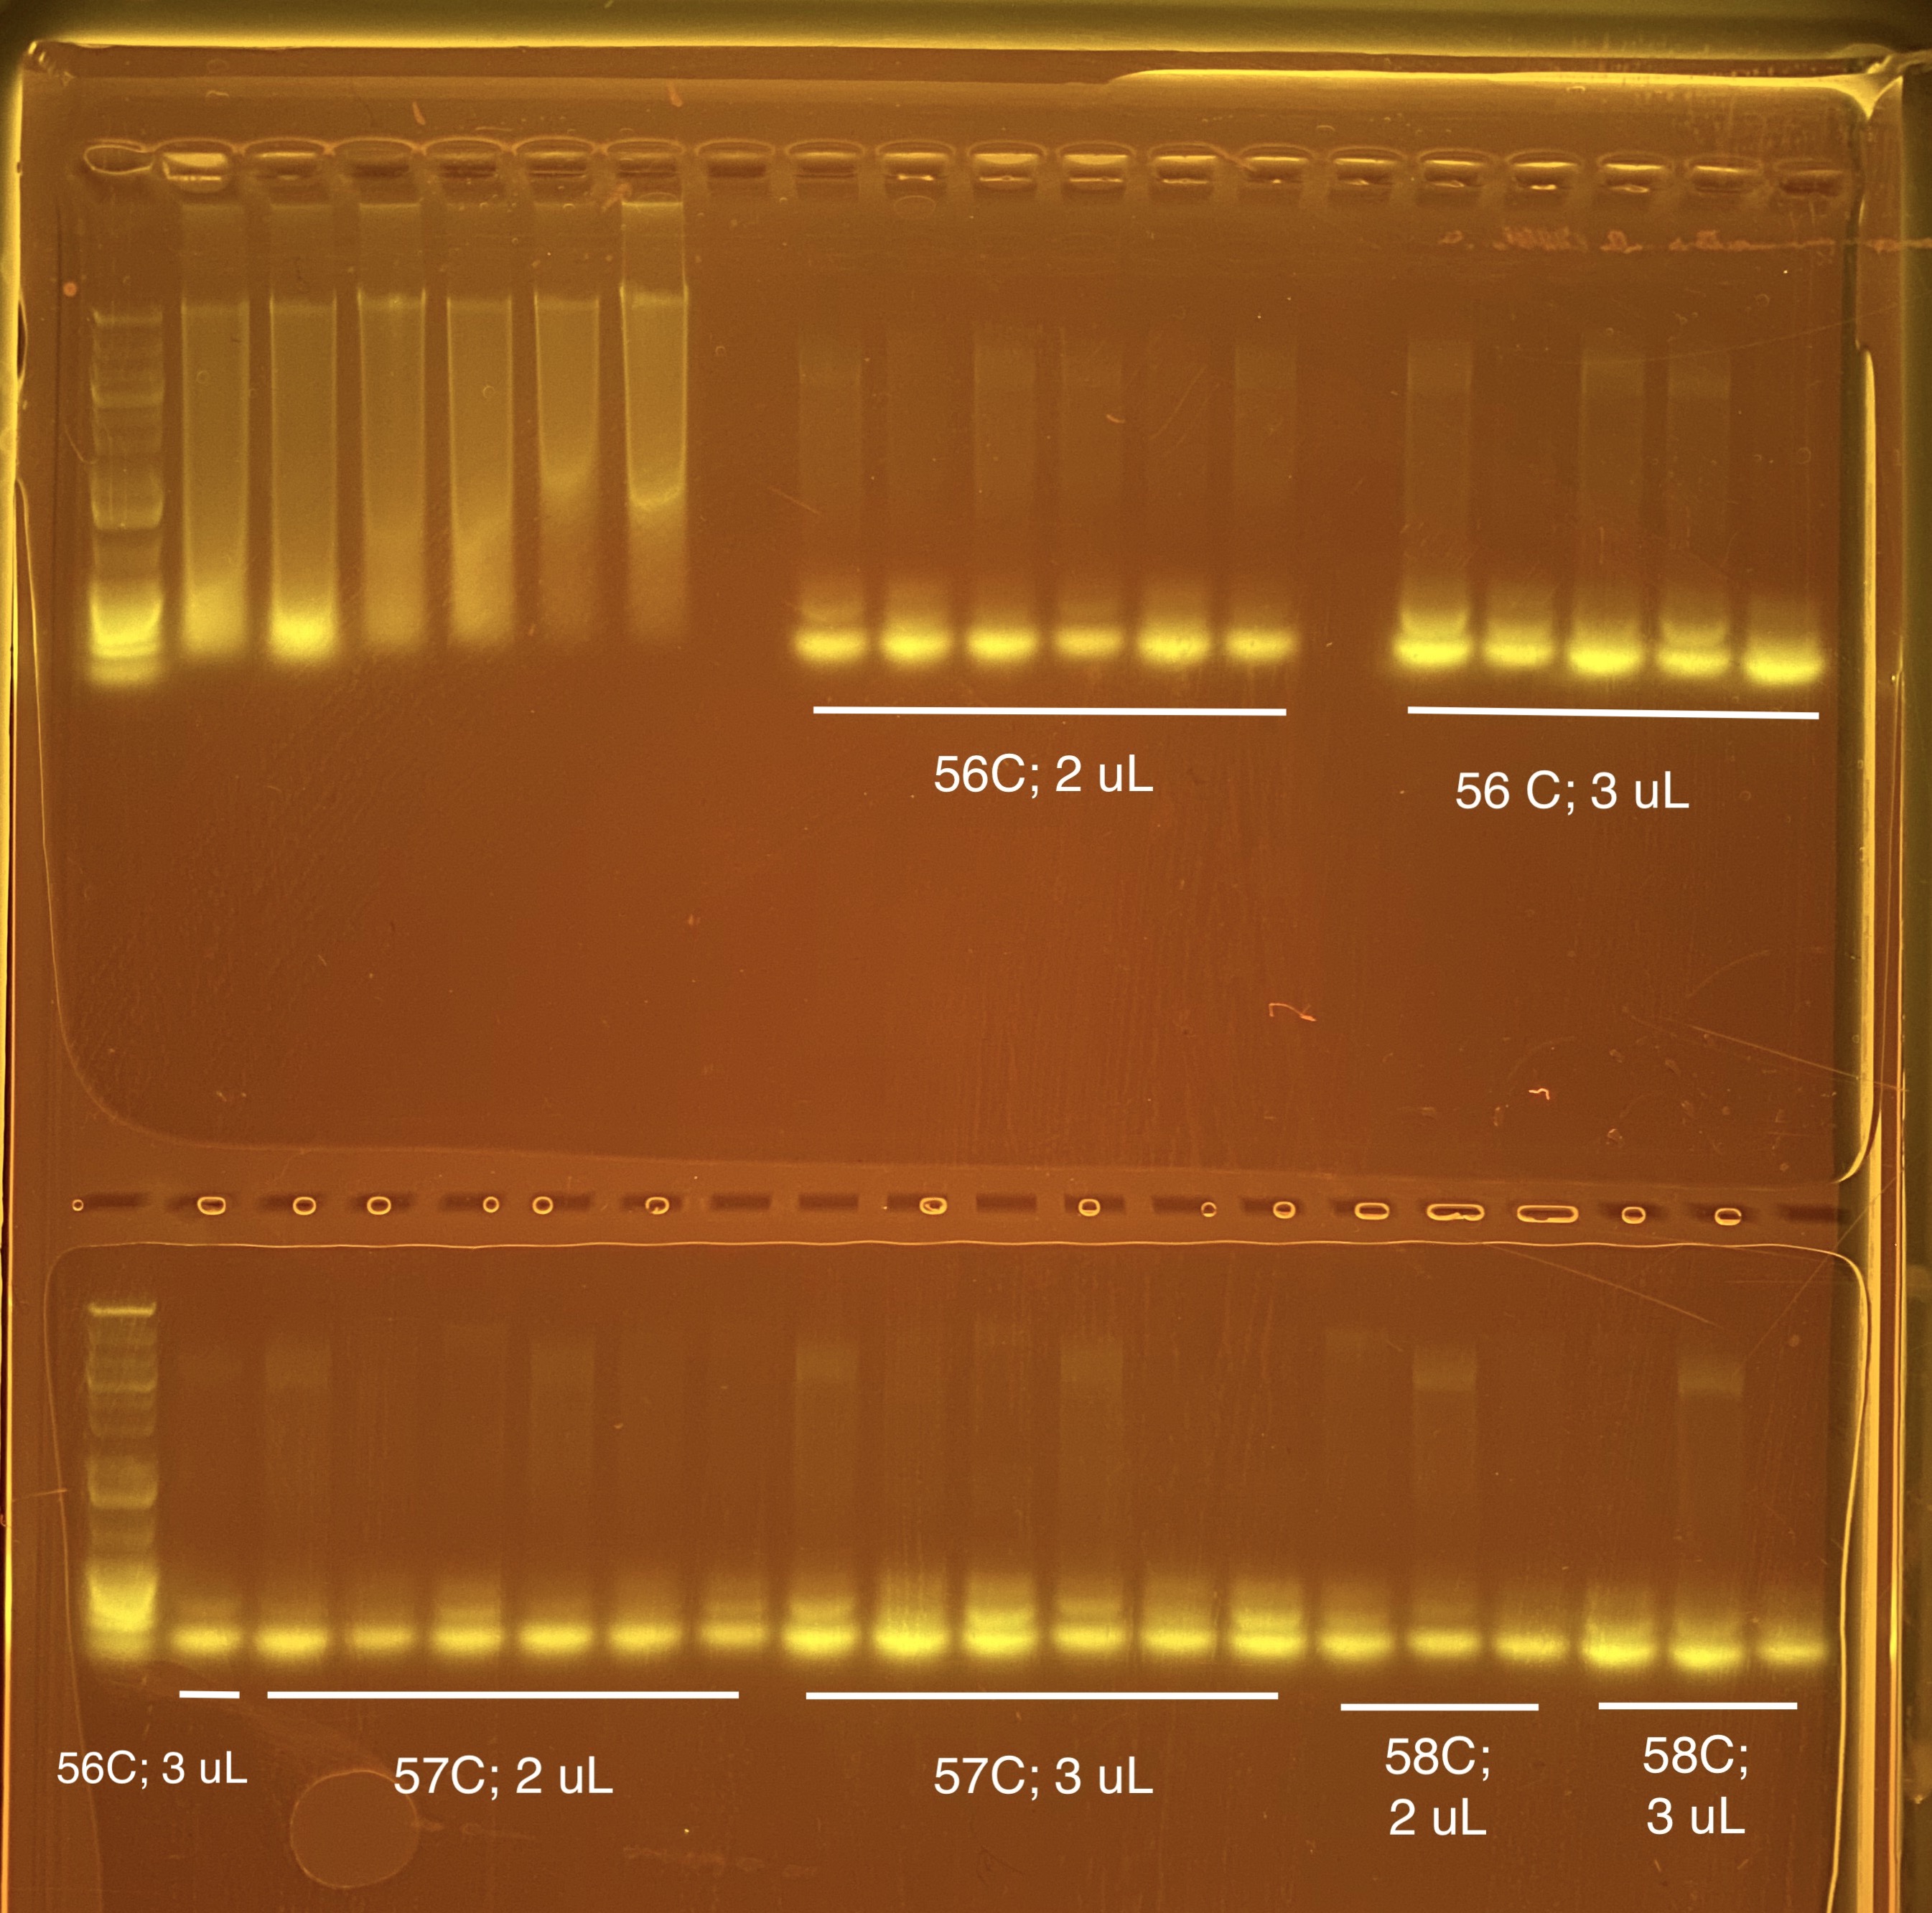
The extra band gets brighter with more primer. It is hard to see the bottom bands on the ladder so next time I will do a longer gel run time (60 minutes instead of 45 minutes). We are now thinking this could actually be primer dimer at the bottom and our band on the top?
20210304 Trial Run 3
I did another gradient of temperatures based on the melting temperature (Tm) of the primers we designed in the first section of this post and primer concentration to see if we could get rid of the primer dimer. This was done in 25 uL instead of 33 uL reactions to save money on supplies.
Tm 515F = 73.4C; Tm 806RB = 68.8C
Melting temperatures are specific to the primers we designed.
Best practices for PCR are to start 3-5C below the lowest melting temperature of the primer. This would be 63.8C so we started with 63C.
3 samples were placed in each strip tube (no duplicates or triplicates) with a negative control. The 10 uM stock was diluted to 1 uM stock (5 uL 10 uM and 45 uL UltraPure water) and the same volumes in the master mix calculations were used for each.
| Strip Tube # | Annealing Temp | Primer added | Tube 1 | Tube 2 | Tube 3 | Tube 4 | Program Name | Thermocyler # |
|---|---|---|---|---|---|---|---|---|
| 1 | 63 | 10 uM | 1321 | 1321 | 1701 | Negative control | 16s v4v5 a | 1 |
| 2 | 63 | 1 uM | 1701 | 1083 | 1154 | Negative control | 16s v4v5 a | 1 |
| 3 | 60 | 10 uM | 1581 | 2743 | 1628 | Negative control | 16s v4v5 b | 2 |
| 4 | 60 | 1 uM | 1581 | 2743 | 1628 | Negative control | 16s v4v5 b | 2 |
| 5 | 57 | 10 uM | 2743 | 1628 | 1050 | Negative control | 16s v4v5 c | 3 |
| 6 | 57 | 1 uM | 2743 | 1628 | 1050 | Negative control | 16s v4v5 c | 3 |
Master Mix calculations:
| 25µl RXN | |||
|---|---|---|---|
| Reagent | Final Conc | Final Conc Units | Volume µl |
| Phusion MM | 1 | X | 12.5 |
| F primer | 10 or 1 | uM | 0.5 |
| R primer | 10 or 1 | uM | 0.5 |
| DNA | 3.3 | ng/µl | 1 |
| Water | 10.5 | ||
| 25 uL total |
24 uL of Master Mix and 1 uL of DNA was added to each tube. 1 uL of Ultrapure water was used in the negative control instead of DNA.
57C with 10 uM primer seems to get good solid bands at ~350 bp and the bottom is primer dimer. My thought is we move forward with the above master mix ratios and cut the bands physically out of the gel.

We decided to change the dilution concentration to 4 ng/uL instead of 3.33 ng/uL so that the total ng per sample across triplicates is 12 ng.