Zymo-Duet-RNA-DNA-Extraction-Protocol
Zymo Duet DNA/RNA Extraction Protocol
Zymo’s Duet RNA DNA Extraction kit was modified for our lab.
Based on Putnam Lab protocols written by: E. Chille and K. Wong.
Reagent Preparation
- Add 96 mL 100% ethanol (104 mL 95% ethanol) to the 24 mL DNA/RNA Wash Buffer concentrate before use. DNA/RNA Wash Buffer included with D7003T (Mini Prep Plus Kit) is supplied ready-to-use and does not require the addition of ethanol prior to use. Check kit contents and instructions to confirm prep steps.
- Reconstitute the lyophilized (freeze-dried) DNase I as indicated on the vial prior to use. Mix by inversion. Store frozen aliquots.
- Reconstitute the lyophilized (freeze-dried) 20 mg Proteinase K with 1040 uL Proteinase K Storage Buffer or lyophilized (freeze-dried) 5 mg Proteinase K with 260 uL Proteinase K Storage Buffer. Vortex to dissolve. Store at -20 °C.
Adult Fragment Tissue Sample Preparation
Bead tubes: 2 mL 0.5 mm glass beads and tubes from Fisher Scientific
Sterilizing working area: I. Rinse clippers with:
- 10% bleach solution
- DI water
- Isopropanol
- RNAse free water
II. Spray gloves with RNAse away and rub hands together.
Take fragments one at a time out of the freezer and sterilize clippers in between every fragment. These steps are time sensitive to prevent the coral fragments and freezer from thawing. Do not rush, but be efficient.
Fragment Clipping in DNA/RNA Shield
- Take 500 uL of DNA/RNA shield from the original sample tube into a new 2 mL 0.5 glass bead tube.
- Using sterilized clippers, cut coral clipping in half (depending on the size, keep the entire clipping) and place in 2 mL 0.5 mm bead tube from step 1.
- Add 500 uL new DNA/RNA shield to the bead tube with the coral fragment from step 1 and 2.
- Proceed to homogenization steps.
Depending on desired DNA RNA quantity, you can increase the amount of uL added of the original DNA RNA shield from the original sampling tube or increase the size of fragment used.
Whole Snap-Frozen Fragment
- Label the side of a bead tube with the coral fragment’s sample ID number, your initials, and today’s date. Label the cap of the bead tube with the coral ID number.
- Add 1000 μl of RNA/DNA shield to the tube.
- Remove desired fragment from -80 °C freezer.
- Using sterilized clippers, clip off 3-4 small pieces and place all the pieces into the 1.5 mL microcentrifuge tube. RNA/DNA shield needs to cover the fragments.
- Proceed to homogenization steps.
Homogenization
These steps remove the coral tissue from the skeleton, leaving the skeleton pieces in the bead tube and the supernatant containing degraded tissue (and DNA/RNA).
- Vortex the 2 mL 0.5 mm glass bead tube for 1 minute for Pocillopora spp. and 2 minutes for Montipora spp.. The amount of time for vortexing will depend on the coral skeletal structure and how easily the tissue separates from the skeleton. Too much vortexing can cause DNA/RNA degradation, but too little vortexing can result in minimal DNA/RNA yield.
- After vortexing, check to see if most of the tissue has come off of the skeleton and that the DNA/RNA shield has darkened in color.
- Remove supernatant and place in a new 1.5 mL microcentrifuge tube*.
Proteinase K Addition
- Place 300 uL of that aliquoted supernatant into a new 1.5 mL microcentrifuge tube for extractions.
- Save the bead tube with the skeleton fragment and leftover aliquoted supernatant tube in -80 °C freezer as a potential back-up in case the extraction doesn’t work. Label 1.5 mL microcentrifuge tube as desired.
- Add 30 µl of PK digestion buffer to each sample tube (1:10 ratio of PK Digestion Buffer:Sample).
- Add 15 µl Proteinase K to each sample tube (1:2 ratio of Proteinase K:PK Digestion Buffer).
- Vortex for 5-10 seconds and spin down.
- Proceed to extraction steps.
We have tried an alternative homogenization method to separate the host and symbiont tissue in the extraction process: Soft and Hard Homogenization. This didn’t work as desired for us, but has room for improvement.
Larvae Sample Preparation
From E. Chille’s Putnam Lab Protocol:
- Take sample tube with larvae 1 at a time out of the -80 °C to minimize amount of thawing
- Add 300 µl DNA/RNA shield directly to the sample tube
- Record tube number
- Add 30 µl of PK digestion buffer to each sample tube
- Add 15 µl Proteinase K to each sample tube
- Vortex and spin down sample tubes
- Place in Thermomixer for ~3 hours at 55 °C, shaking at 1100 rpm. Check periodically to monitor digestion progress.
- After digestion proceed with DNA and RNA Extraction.
Excessive heating can cause DNA degradation so when starting a batch of samples, I would recommend a trial/error process to select the most ideal length of time for your samples.
DNA Extraction
- Set up yellow DNA spin columns and collection tubes, label appropriately
- Warm elution liquids to 70 degrees °C (10mM Tris HCl pH. 8.0 and RNase free water)
- Add equal volume (345 µl) DNA/RNA lysis buffer to each sample tube
- Finger flick to mix tubes
- Add 700 µl (total volume) of sample gently to the yellow DNA spin column
- Centrifuge at 16,000 rcf (g) for 30 seconds
- Important Save the flow through from this step: transfer to a new 1.5mL tube labeled for RNA
- Add 400µl DNA/RNA Prep Buffer gently to the yellow DNA spin columns
- Centrifuge at 16,000 rcf (g) for 30 seconds
- Discard flow through (Zymo kit waste)
- Add 700 µl DNA/RNA Wash Buffer gently to the yellow DNA spin columns
- Centrifuge at 16,000 rcf (g) for 30 seconds
- Discard flow through (Zymo kit waste)
- Add 400 µl DNA/RNA Wash Buffer genetly to the yellow DNA spin columns
- Centrifuge at 16,000 rcf (g) for 2 minutes
- Discard flow through (Zymo kit waste)
- Transfer yellow columns to new 1.5mL microcentrifuge tubes
- Add 50 µl warmed 10 mM Tris HCl to each yellow DNA column by dripping slowly directly on the filer
- Incubate at room temp for 5 minutes
- Centrifuge at 16,000 rcf (g) for 30 seconds
- Repeat steps 18-20 for a final elution volume of 100 µl
- Label tubes, store at 4 °C if quantifying the same day or the next, if waiting longer store in -20 °C
RNA Extraction
Can do concurrently with DNA Extraction after DNA Extraction Step 7
- Add equal volume (700 µl) 100% EtOH to the 1.5mL tubes labeled for RNA containing the original yellow column flow through
- Vortex and spin down to mix
- Add 700 µl of that liquid to the green RNA spin columns
- Centrifuge at 16,000 rcf (g) for 30 seconds
- Discard flow through (Zymo kit waste)
- Add 700 µl to the green RNA spin columns (the rest from the 1.5mL RNA tubes)
- Centrifuge at 16,000 rcf (g) for 30 seconds
- Get DNase I from freezer
- Discard flow through (Zymo kit waste)
- Add 400 µl DNA/RNA Wash Buffer gently to each green RNA column
- Centrifuge at 16,000 rcf (g) for 30 seconds
- Discard flow through (Zymo kit waste)
- Make DNase I treatment master mix:
- 75µl DNA Digestion buffer x # of samples
- 5µl DNase I x # of samples
- Add 80 µl DNase I treatment master mix directly to the filter of the green RNA columns
- Incubate at room temp for 15 minutes
- Add 400 µl DNA/RNA Prep Buffer gently to each column
- Centrifuge at 16,000 rcf (g) for 30 seconds
- Discard flow through (Zymo kit waste)
- Add 700 µl DNA/RNA Wash Buffer gently to the green RNA spin columns
- Centrifuge at 16,000 rcf (g) for 30 seconds
- Discard flow through (Zymo kit waste)
- Add 400 µl DNA/RNA Wash Buffer genetly to the green RNA spin columns
- Centrifuge at 16,000 rcf (g) for 2 minutes
- Discard flow through (Zymo kit waste)
- Transfer green columns to new 1.5mL microcentrifuge tubes
- Add 50µl warmed DNase/RNase free water to each green RNA column by dripping slowly directly on the filer
- Incubate at room temp for 5 minutes
- Centrifuge at 16,000 rcf (g) for 30 seconds
- Repeat steps 25-27 for a final elution volume of 100µl
- Label 1.5mL tubes on ice afterwards, and aliquot 5µl into PCR strip tubes to save for Qubit and Tape Station to avoid freeze-thaw of your stock sample
- Store all tubes in the -80 °C
Extraction Content Analysis
These steps analyze the quantity and quality of the DNA/RNA extracted and may be done on a separate day from the extraction.
RNA/DNA Quantity
Follow Broad Range dsDNA and RNA Qubit protocol to analyze sample ++quantity++. Read all samples twice.
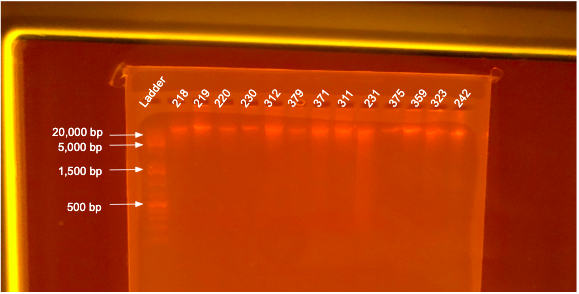
DNA Quality
If DNA quantity is sufficient (typically >10 ng/µL) follow the PPP Agarose Gel Protocol to determine DNA quality. “Good” DNA should form a distinct band a the very top of the gel. See example below:
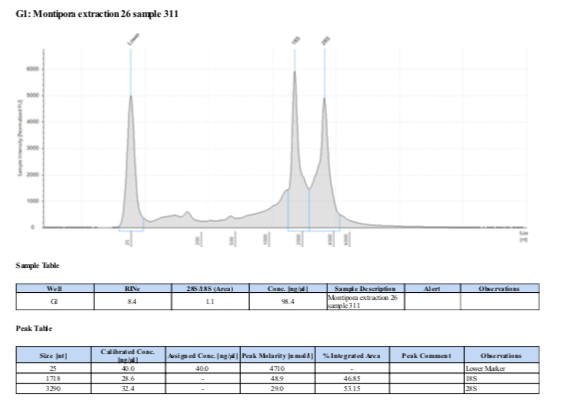
RNA Quality
If RNA quantity is sufficient follow the Tape Station Protocol to determine RNA quality and obtain a RNA Integrity Number (RIN). “Good” RNA should have a RIN above 8.0 and form two distinct peaks at the 18S and 28S locations. See example below: